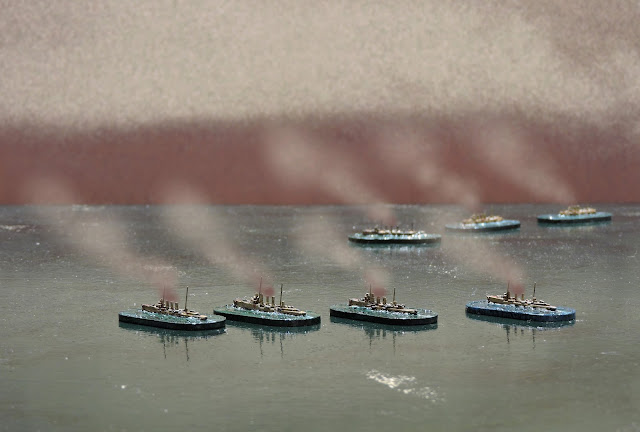
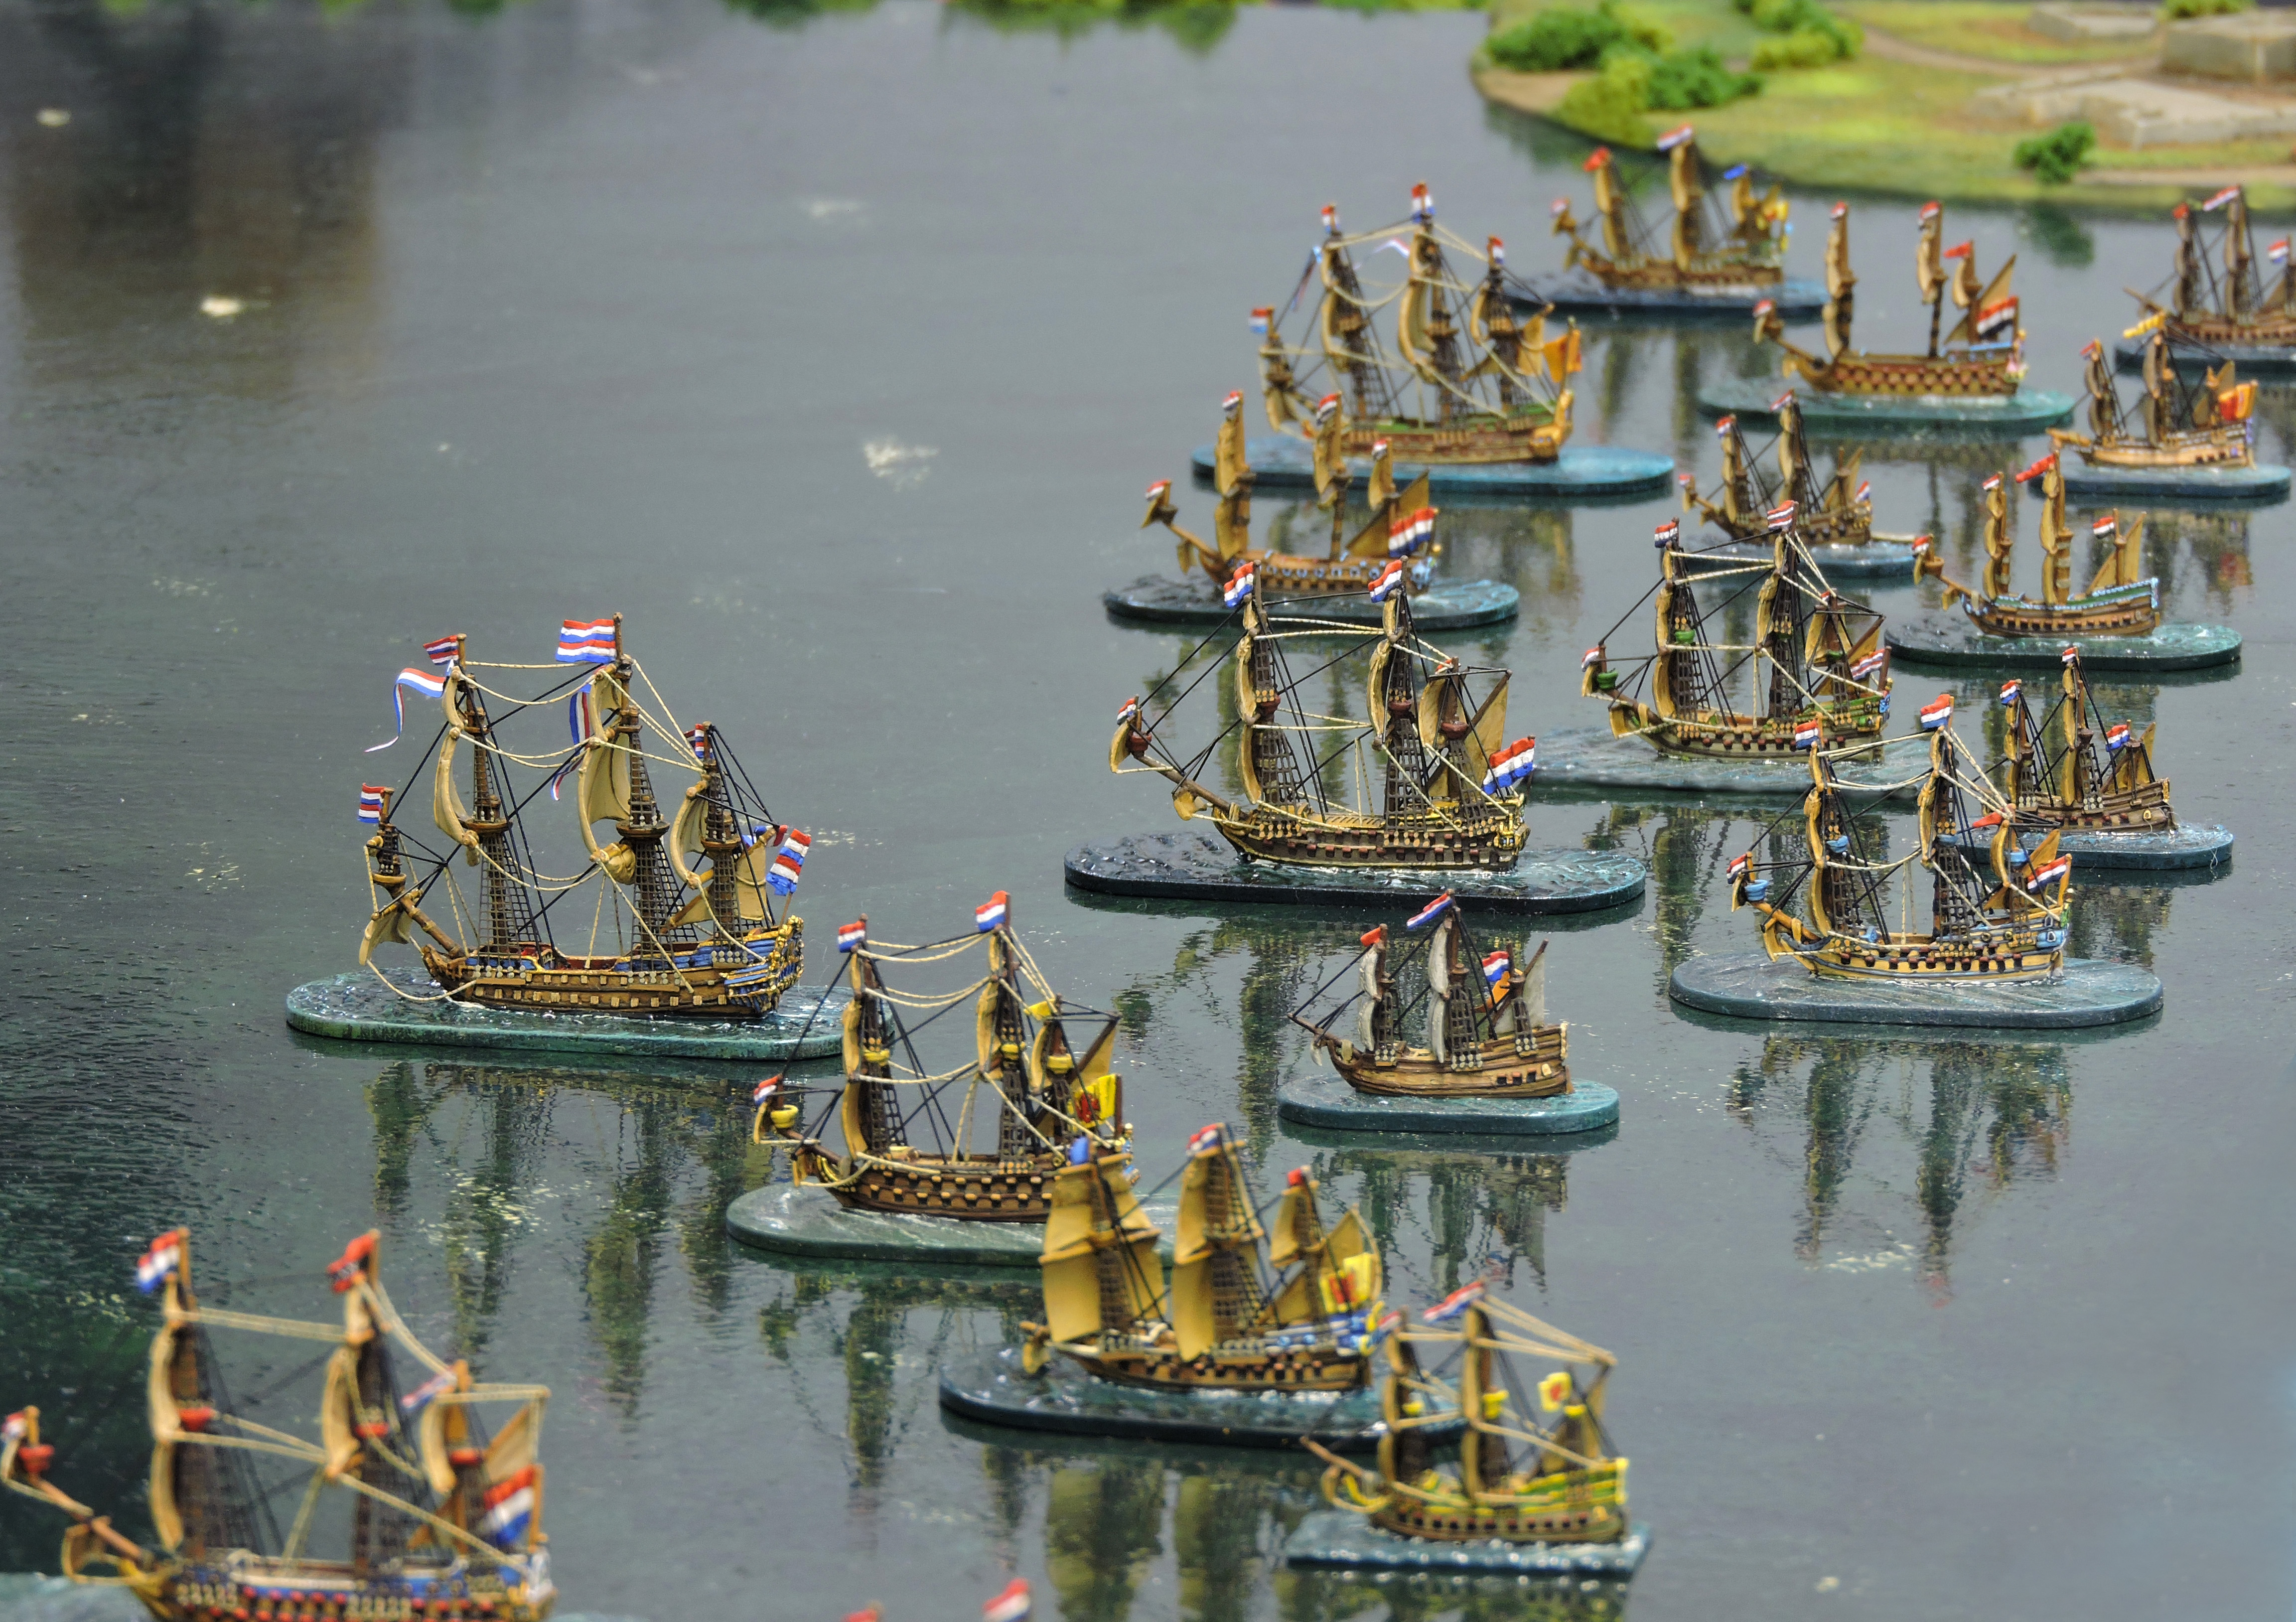
sample page from Rolling Thunder! |
We are developing new products all the time. Right now I am close to finishing and publishing the Mad for War fleet rules which are called Rolling Thunder! The system uses multi-based ships on a 1:1 basis utilizing smaller scale models to facilitate the painting and use of entire fleets in the Anglo-Dutch War period. This can mean upward of 100 ships per side.
sam... |
sample page from Rolling Thunder! |
We are developing new products all the time. Right now I am close to finishing and publishing the Mad for War fleet rules which are called Rolling Thunder! The system uses multi-based ships on a 1:1 basis utilizing smaller scale models to facilitate the painting and use of entire fleets in the Anglo-Dutch War period. This can mean upward of 100 ships per side.
sample page from Rolling Thunder! |
The system is tidy and produces very realistic results based on the tried and tested mechanics of Mad for War but for epic scale battles such as The Four Days Battle June 1-4, 1666, done ship for ship.
Squadron data card sample page from Rolling Thunder! |
I burned a lot of brain time pondering the mechanism adaptions and blithely accepted certain other aspects without really questioning them. Something was not sitting right without being able to put my finger on it. It pinged across the synapses for months, but it was only the bubbling up of yet another project which finally got me to recognize my unresolved and unquantified unease.
Full Dutch squadron ship for ship |
As I painted some superb 1/4800 scale protos of WW1 ships which Ark Royal hope to release in 2023, I questioned myself. These are 1/4800 right? Maybe not, has the designer produced 1/6000 scale without us talking about it? How did I arrive at this stomach lurching moment? How could I be questioning the work of someone who is amazingly accurate in everything they produce? It must be me that has made the error.
Ark Royal British WW1 Amoured cruisers in 1/4800 scale |
Well, one of the painted cruisers was sitting on my work table beside 1/4800 ships I had been basing up for Rolling Thunder! The sailing ships looked massive beside the cruiser. I knew the cruiser was 500 feet long and the biggest 17th century sailing ship was no more than 200 feet including the bowsprit with most being nearer 150 feet. This is less than 33% of the size of the cruiser, yet, the sailing ship model was massive in both height and length compared to the cruiser.
See table (accuracy of 1/4800 HMS Glorious) |
It was time for the most fundamental of checks so, out came the ruler and calculator. What I have discovered is that the models I have assumed to be 1/4800, because they are marketed thus, are more likely to be be somewhere between 1/2400 and 1/3000. Rulers and arithmetic don't lie.
Screen grabs of computer generated size differential on Dutch 80 gun 1672 |
To challenge my thinking I bought a 1/3000 Navwar AD Wars 1st rate. Compared to the TD 1/4800 it is tiny although, it should be significantly larger.
I am a little surprised this anomaly has not been spotted before knowing the general thinking patterns of our brethern. It does not materially changed anything in the attractiveness of the models, nor does it affect all the work done so far in multibasing nearly 200 of these models. Most importantly of all, it does not impact Rolling Thunder! in any way other than, I will no longer say the rules are designed for use with 1/4800 ships, rather, they are for use with multi-based ships.
Ark Royal 1/4800 QE (circa 643 feet long) |
TD 1/4800 4th rate |
TD 1/4800 1st Rate |
An exercise in pedantry? No, I don't think it is. I think true 1/4800 is far too small a scale to game sailing ships. Grains of rice would suffice. The ships I have painted are quirky and nice and probably as small as it is feasible to go, they should not however, be called 1/4800.
]]>I painted up a bunch of 1/4800 WWI era armoured cruisers to play a few games at home. This scenario is on a 4 x 2' table. The rules are Majestic 12's Grand Fleet. I have been familiarizing myself with these for a couple of weeks.
The Germans thus far have not done so well. I constructed two equal points orbats which pitted a British armoured cruiser...
]]>I painted up a bunch of 1/4800 WWI era armoured cruisers to play a few games at home. This scenario is on a 4 x 2' table. The rules are Majestic 12's Grand Fleet. I have been familiarizing myself with these for a couple of weeks.
The Germans thus far have not done so well. I constructed two equal points orbats which pitted a British armoured cruiser squadron against two German cruiser squadrons. I made all of the German ships Veteran and the British were Trained with the crew of Black Prince as Raw. The Germans had seven ships and the British four. This brought the points in at 156 and 157 respectively.
The objective was to cause the other side to withdraw. The British squadron commander was randomly rated as a total numpty and both German commanders rated good. The British ships are generally more durable and have bigger guns and better armour. The older German cruisers were weak and moved at the same speed at the British. The newer, faster German cruisers were lightly armoured and more brittle, but packed a reasonable punch.
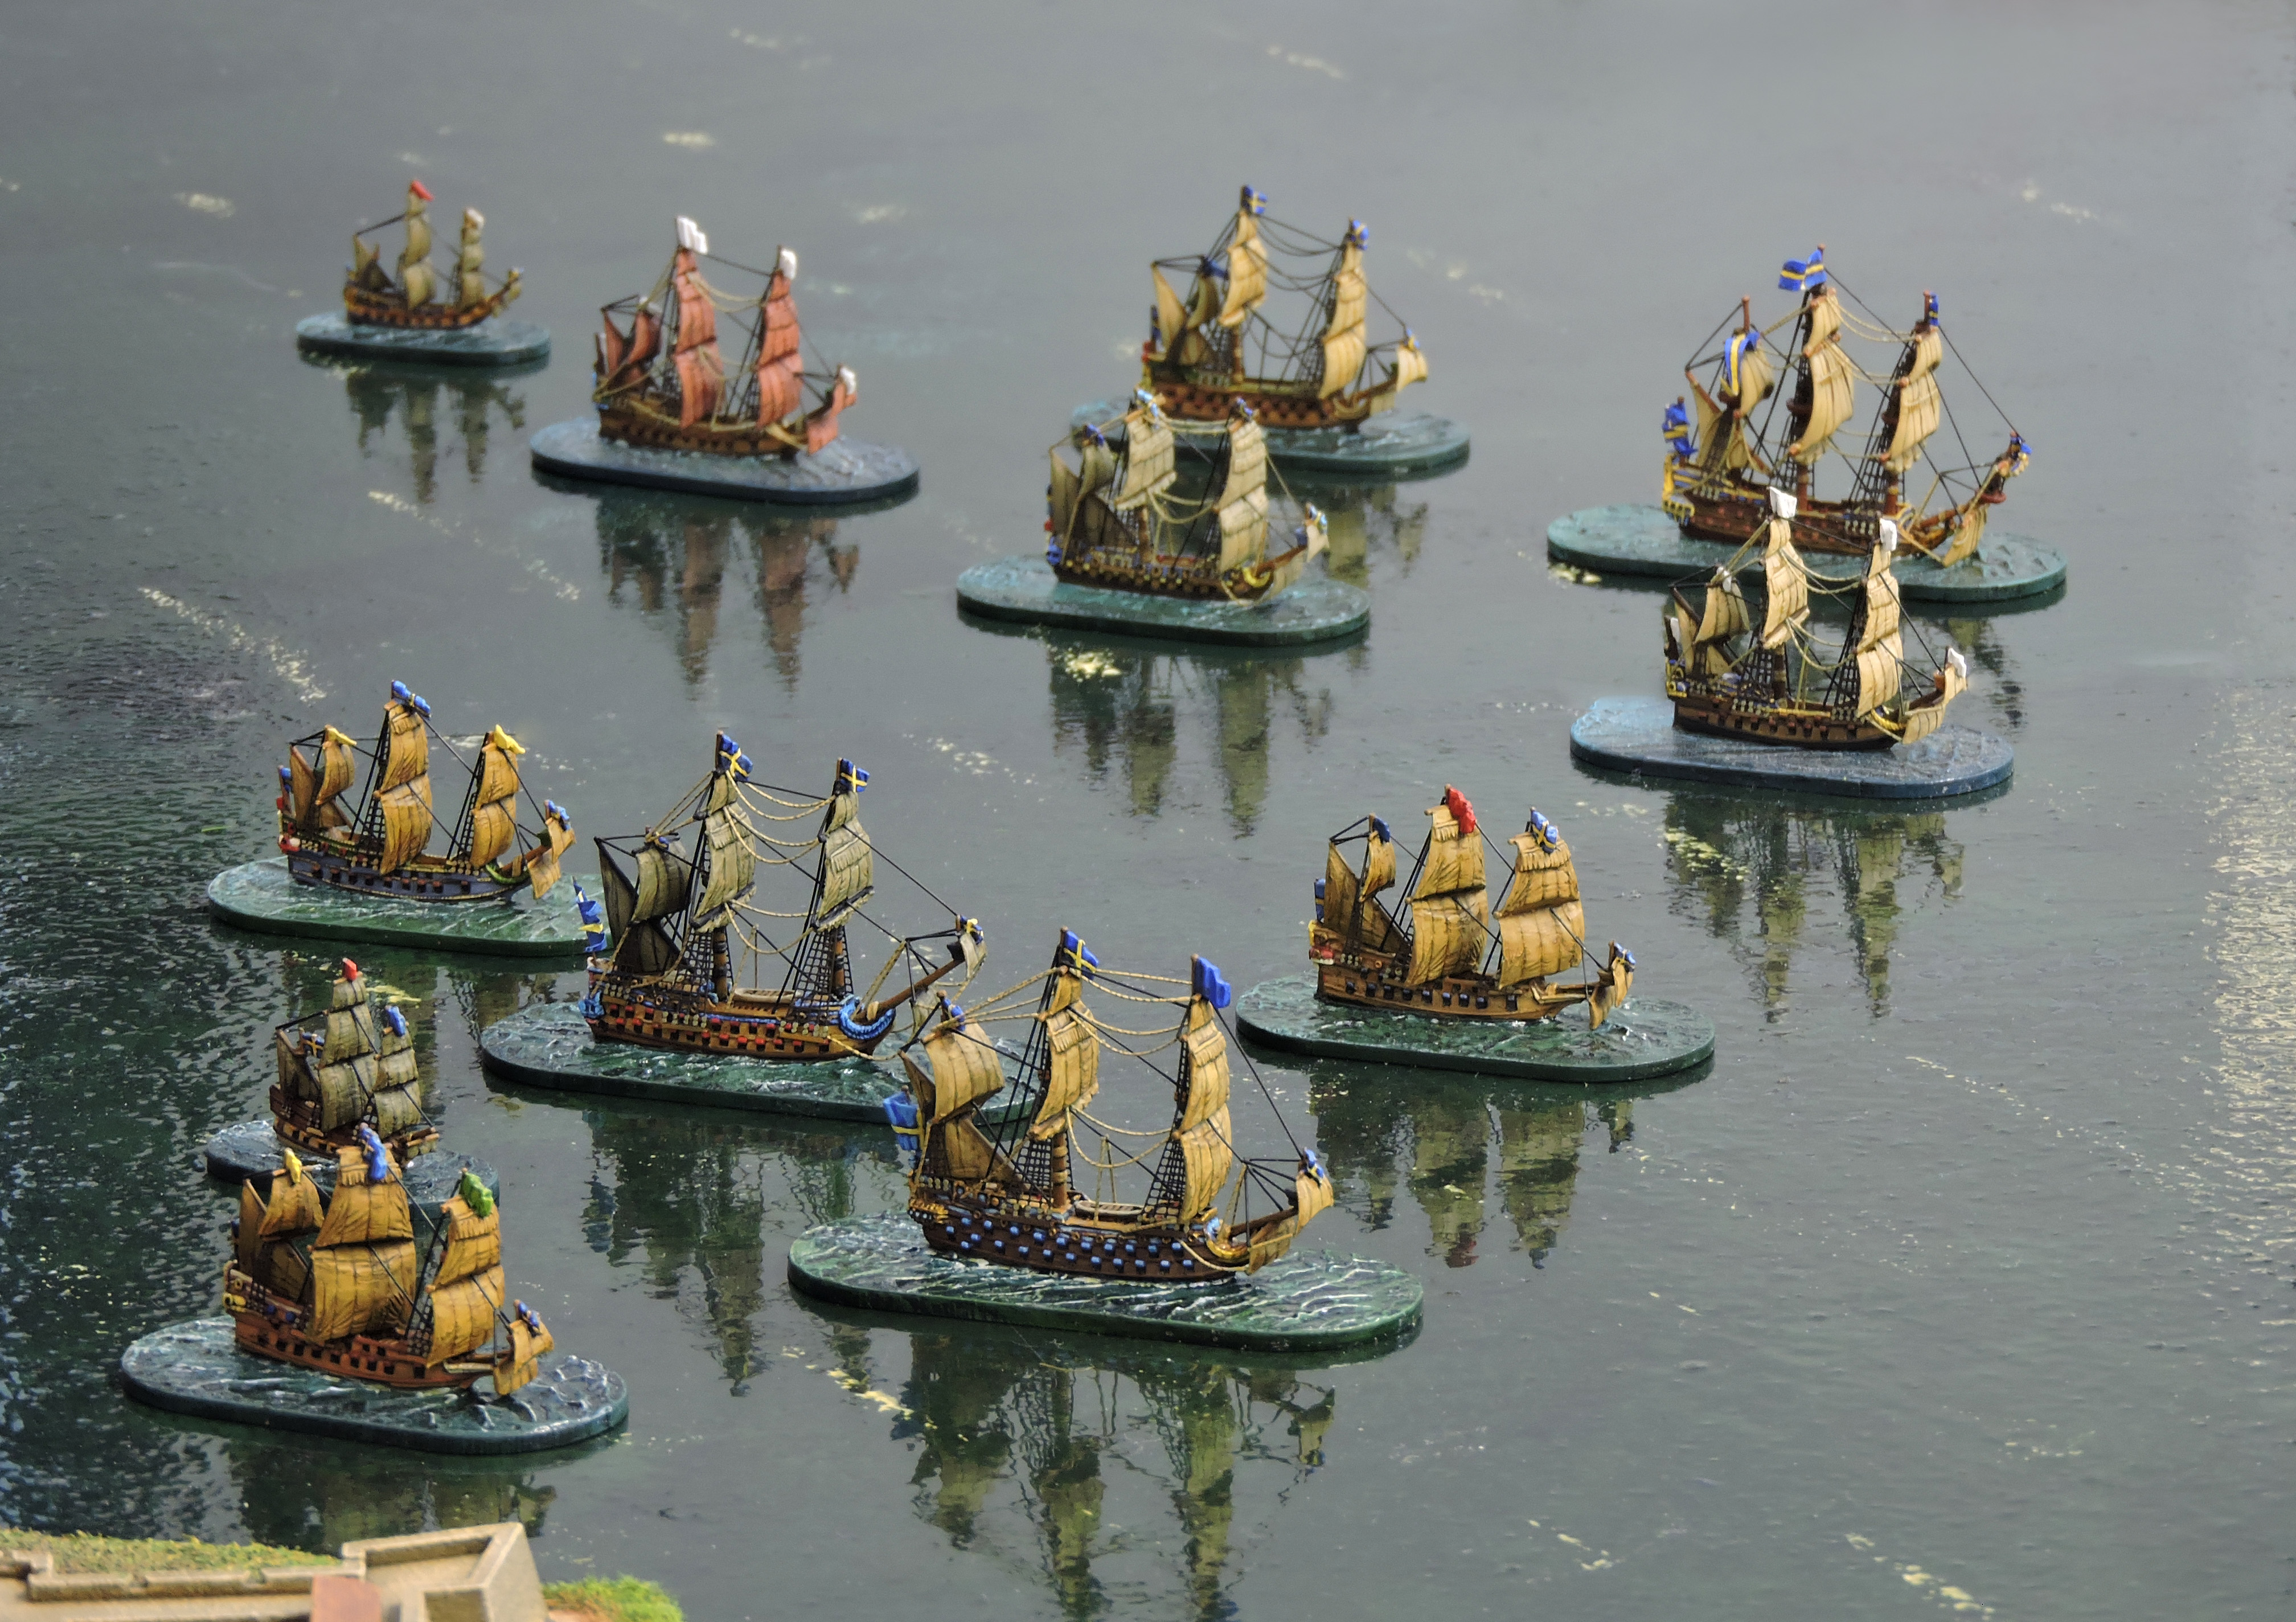
British Squadron: HMS Shannon (Flagship), HMS Argyll, HMS Black Prince, HMS Bristol.
German Squadron: SMS Dresden (Flagship), SMS Danzig, SMS Augsburg
German Fast Squadron: SMS Graudenz (Flagship), SMS Pillau, SMS Koenigsberg, SMS Bremse.
Three of the cruiser names having more than a passing nod to my interest in 17h century history.
Each game turn represents six minutes of real time. I took nine game turns or almost one real time hour, to get a result.
Movement can be up to 12 inches (6,000 yards) per move. The sea conditions can speed up or slow down certain ships. Here is what happened, it was a lot of fun.
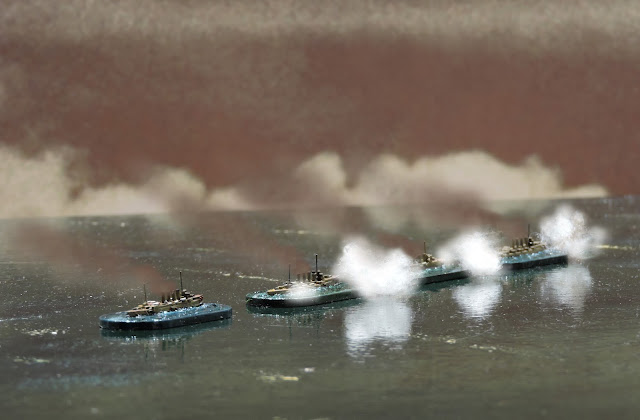
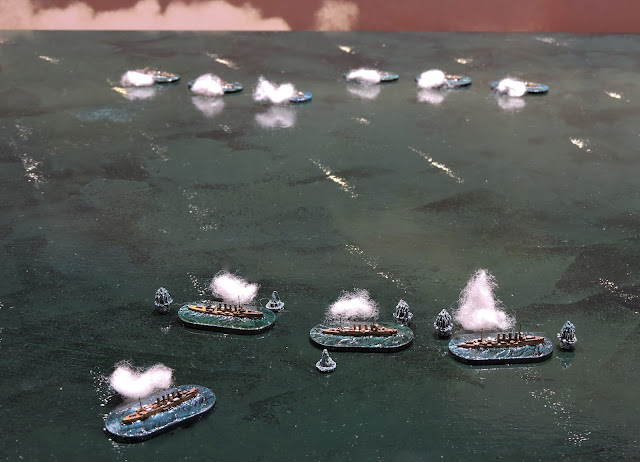
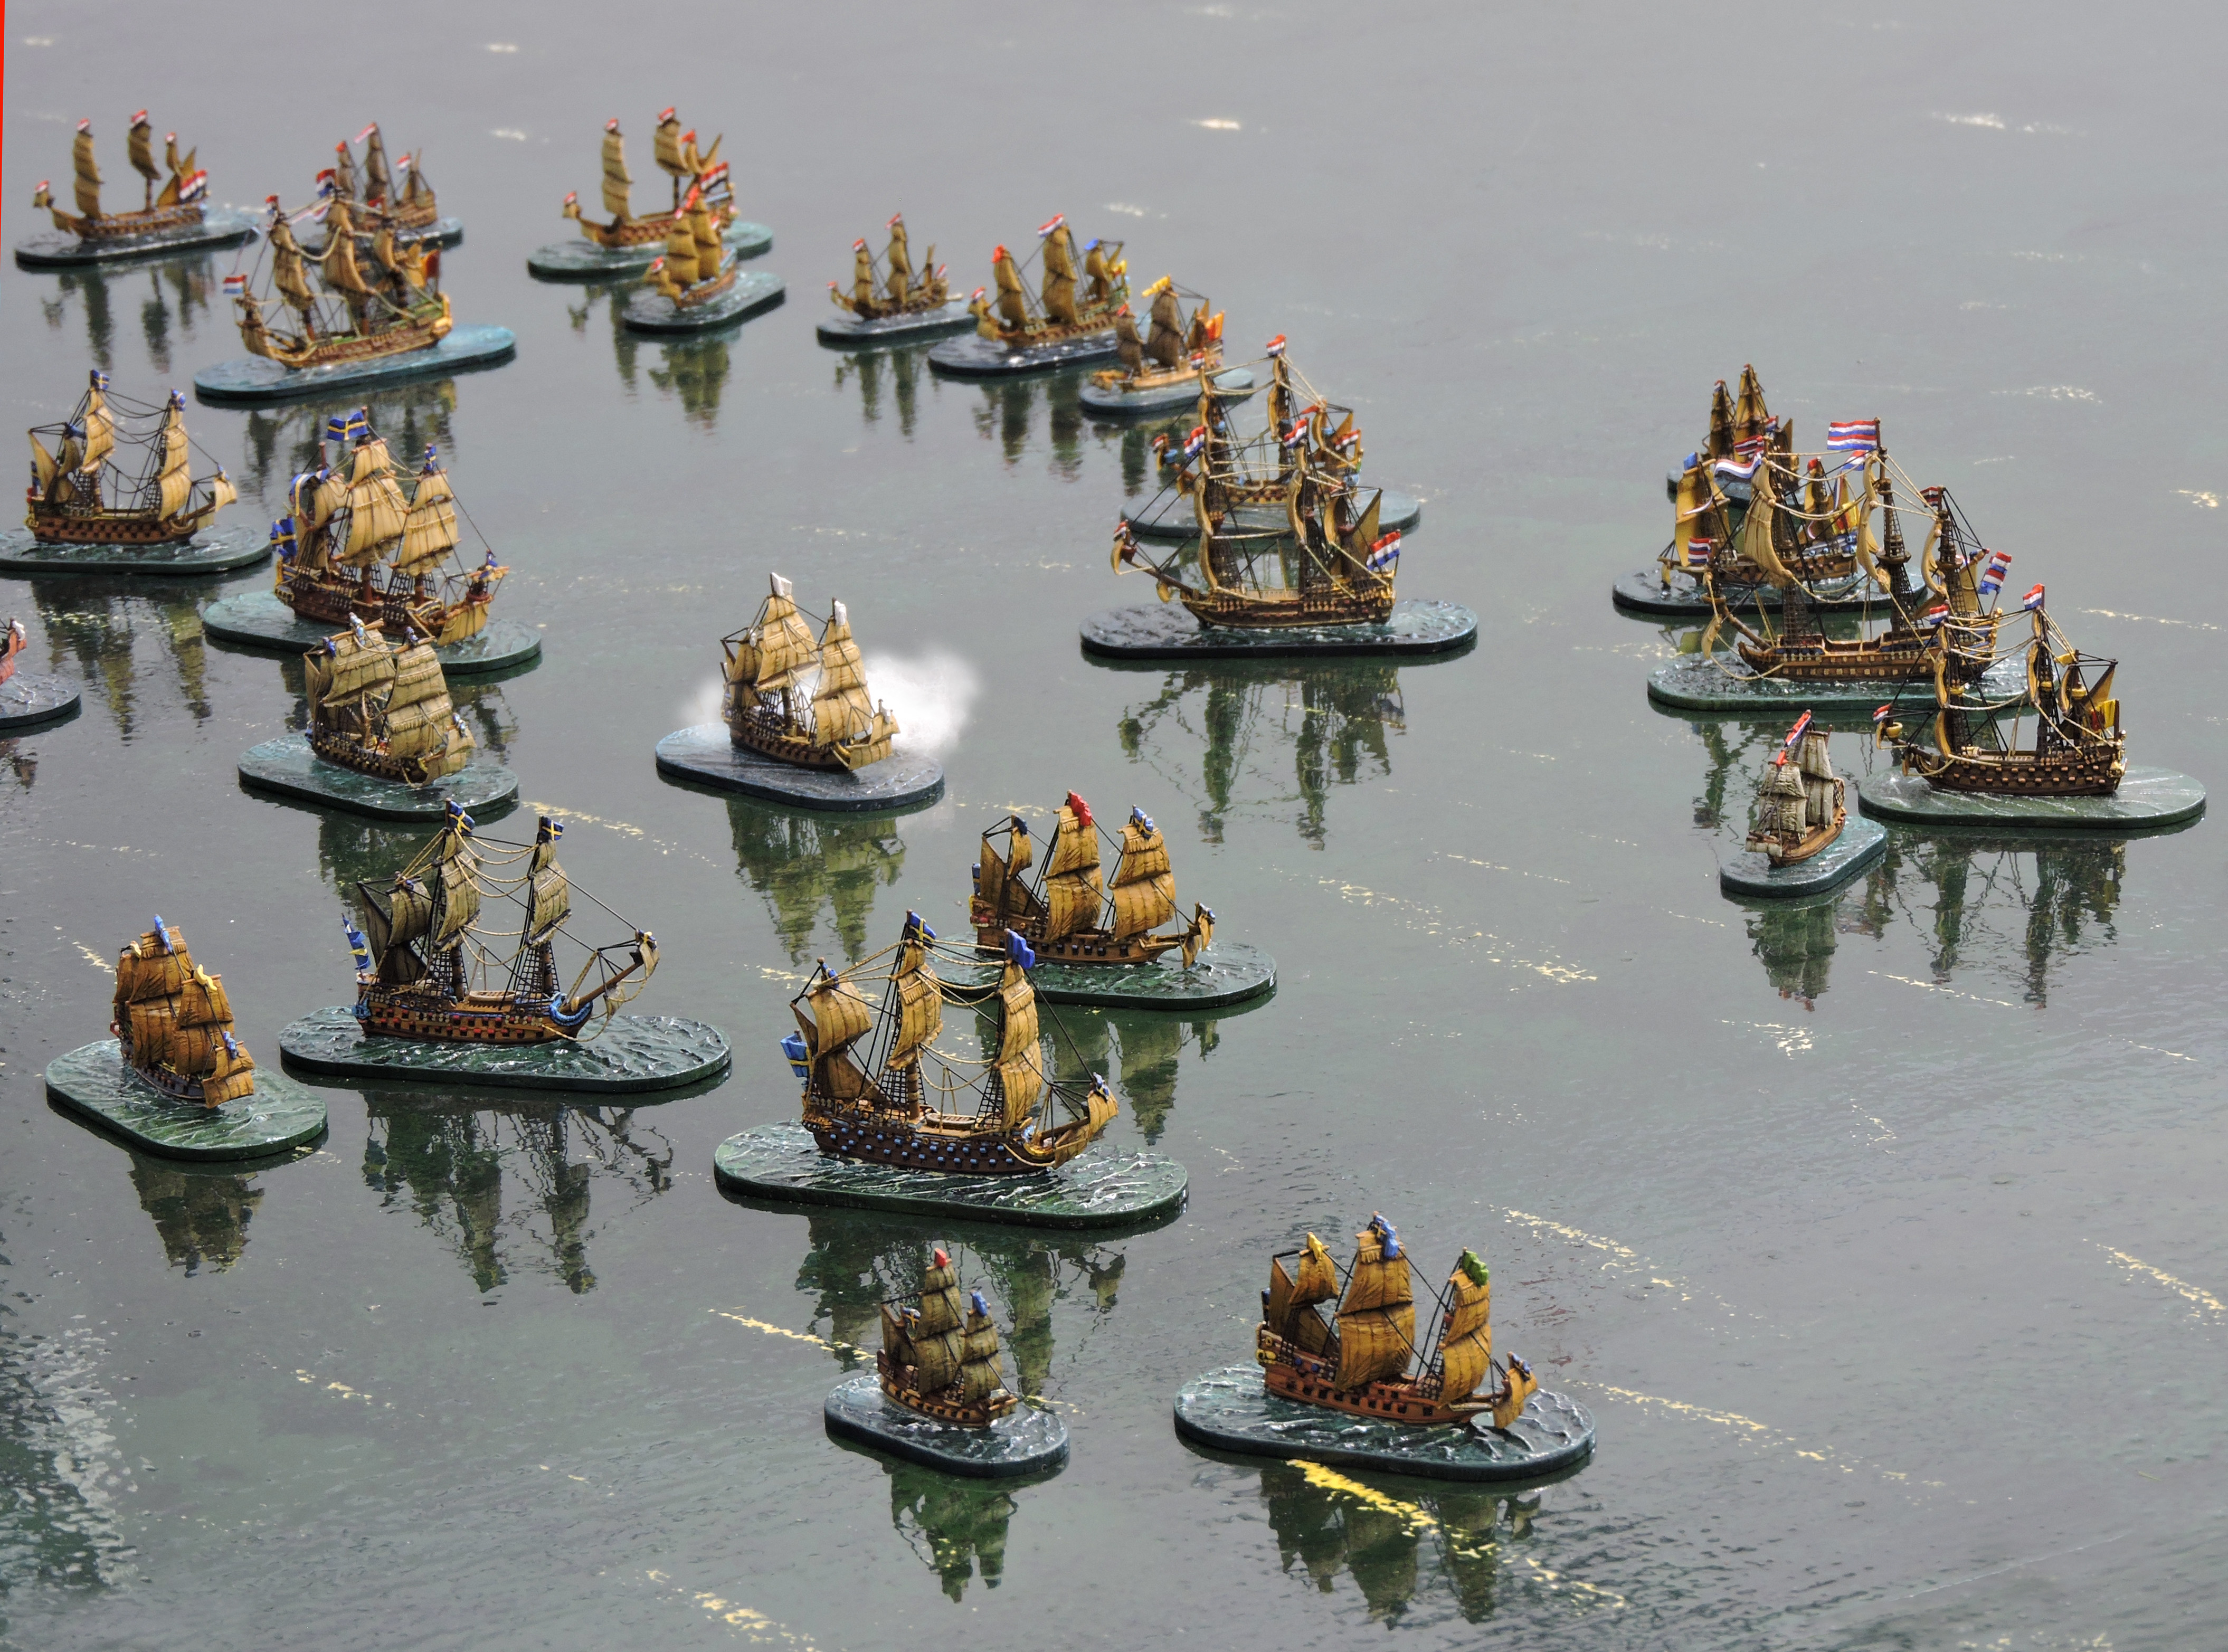
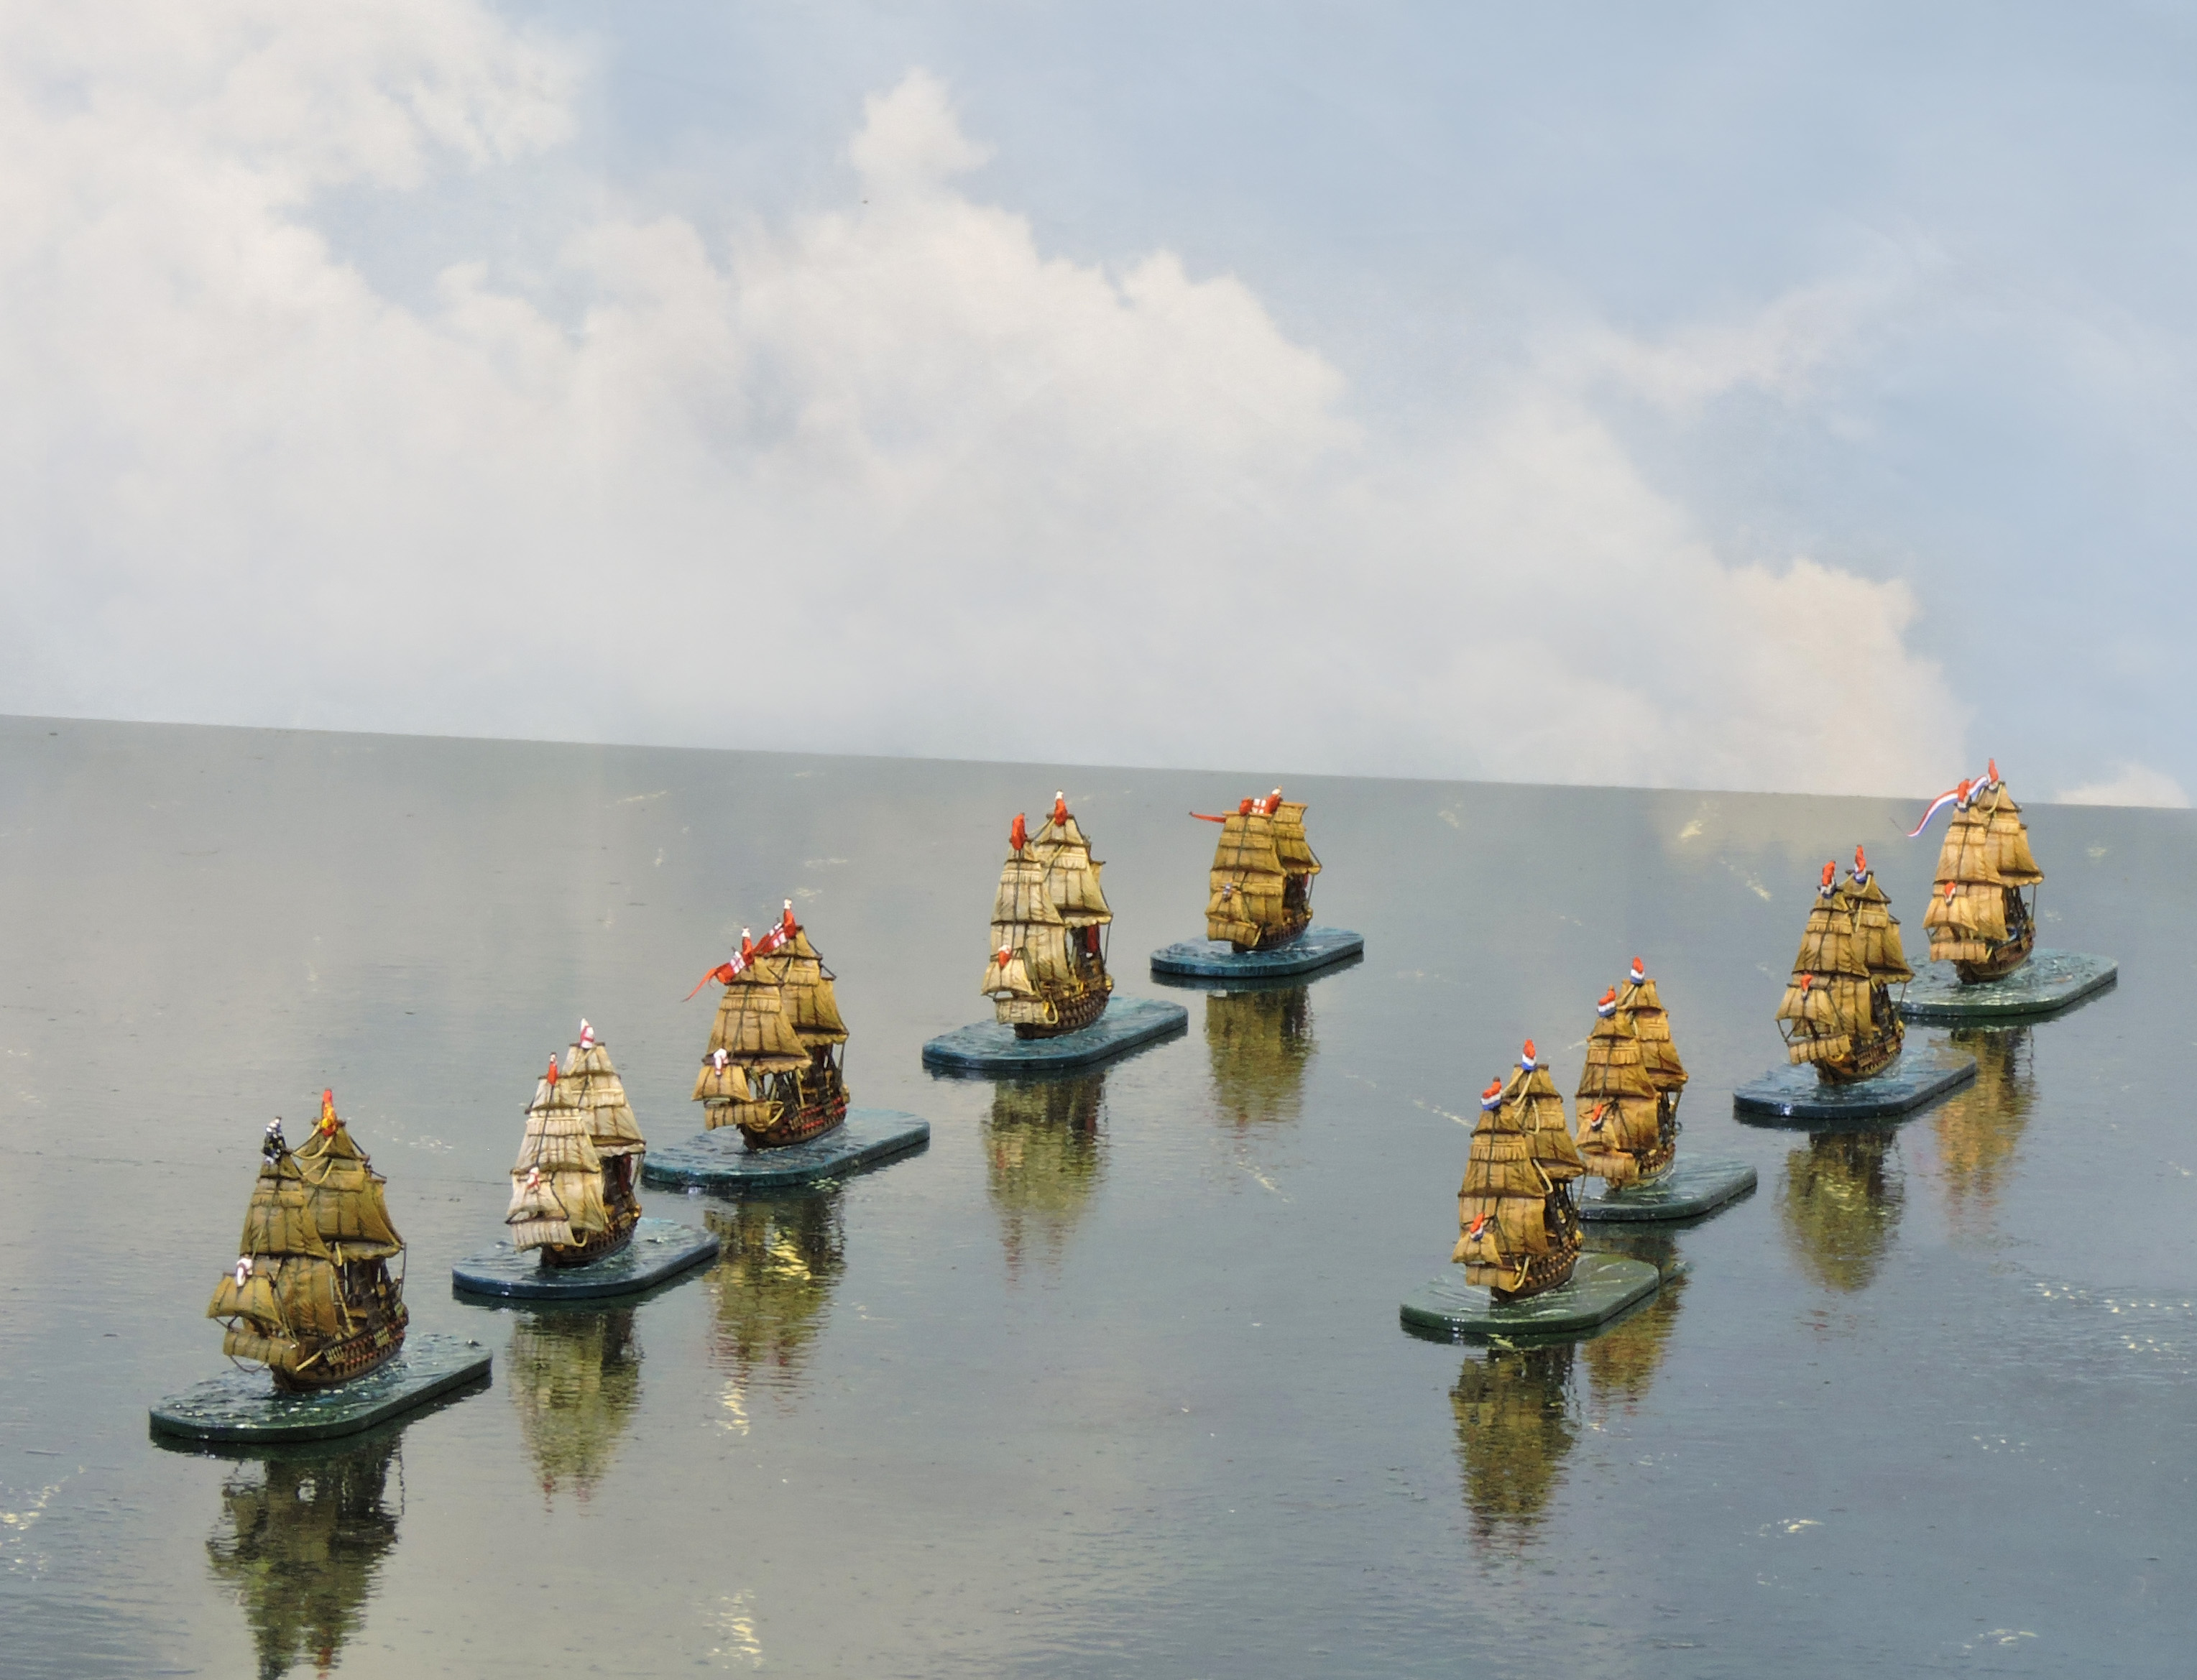
Opening salvo - The British shoot at 12,000 yards |
0620 The British, in line astern open fire at 12,000 yards beyond the range of the enemy. Shannon and Black Prince score early hits on Graudenz which is leading the fast squadron.
Graudenz comes under early and sustained fire |
0626 Graudenz takes further hits and begins to slow down. She and Augsburg find the range of Shannon and land three hits on her.
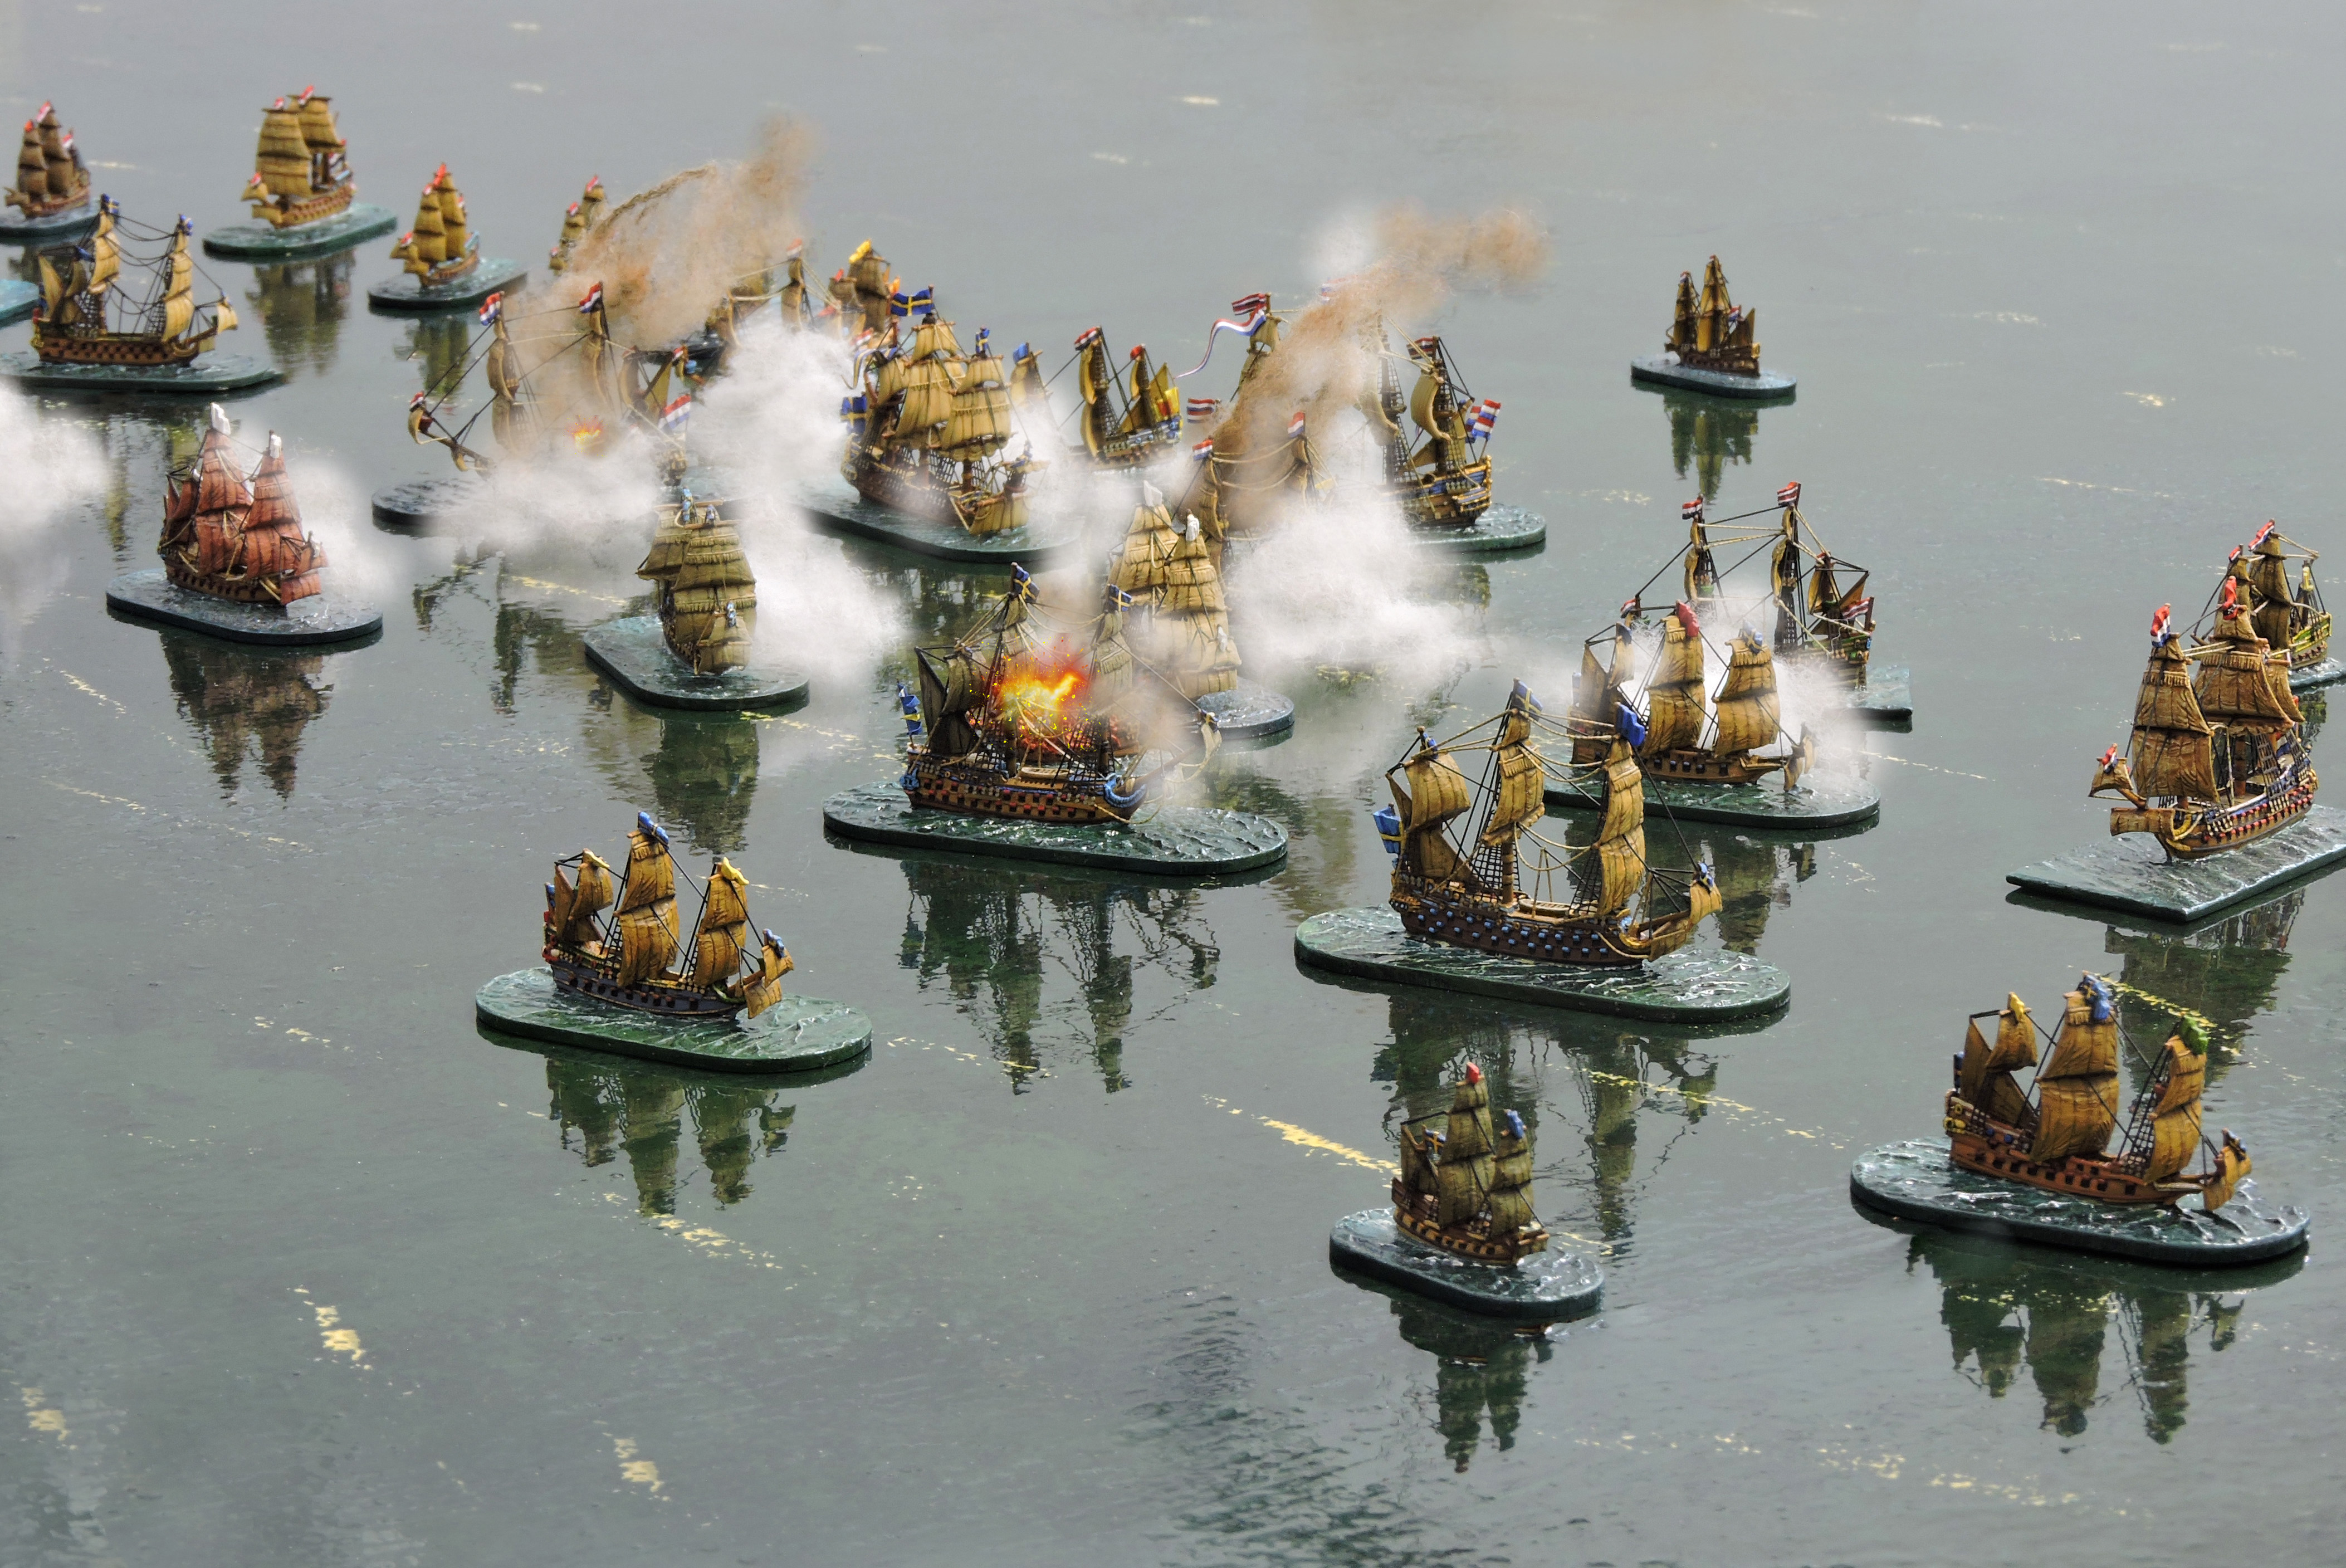
Shattered by gunfire Graudenz if finished by a torpedo (can you see the traces?) |
0632 The gunnery exchange continues with Koenigsberg joining the bombardment of Shannon. She loses a 7.5inch gun to a direct hit. Graudenz continues to be the focus of British fire and takes further serious damage. Both sides launch torpedoes. Three German ships targeting Shannon, all miss. Three British ships target Graudenz, Shannon and Argyll shoot wide but Black Prince score a hit which causes Graudenz to explode and sink! The inexperienced crew of Black Prince show how it should be done!
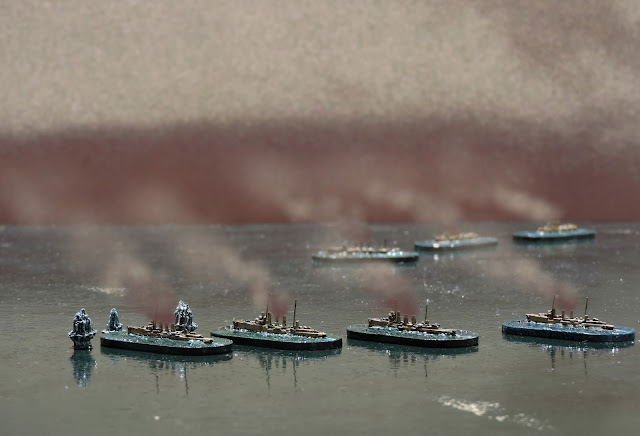
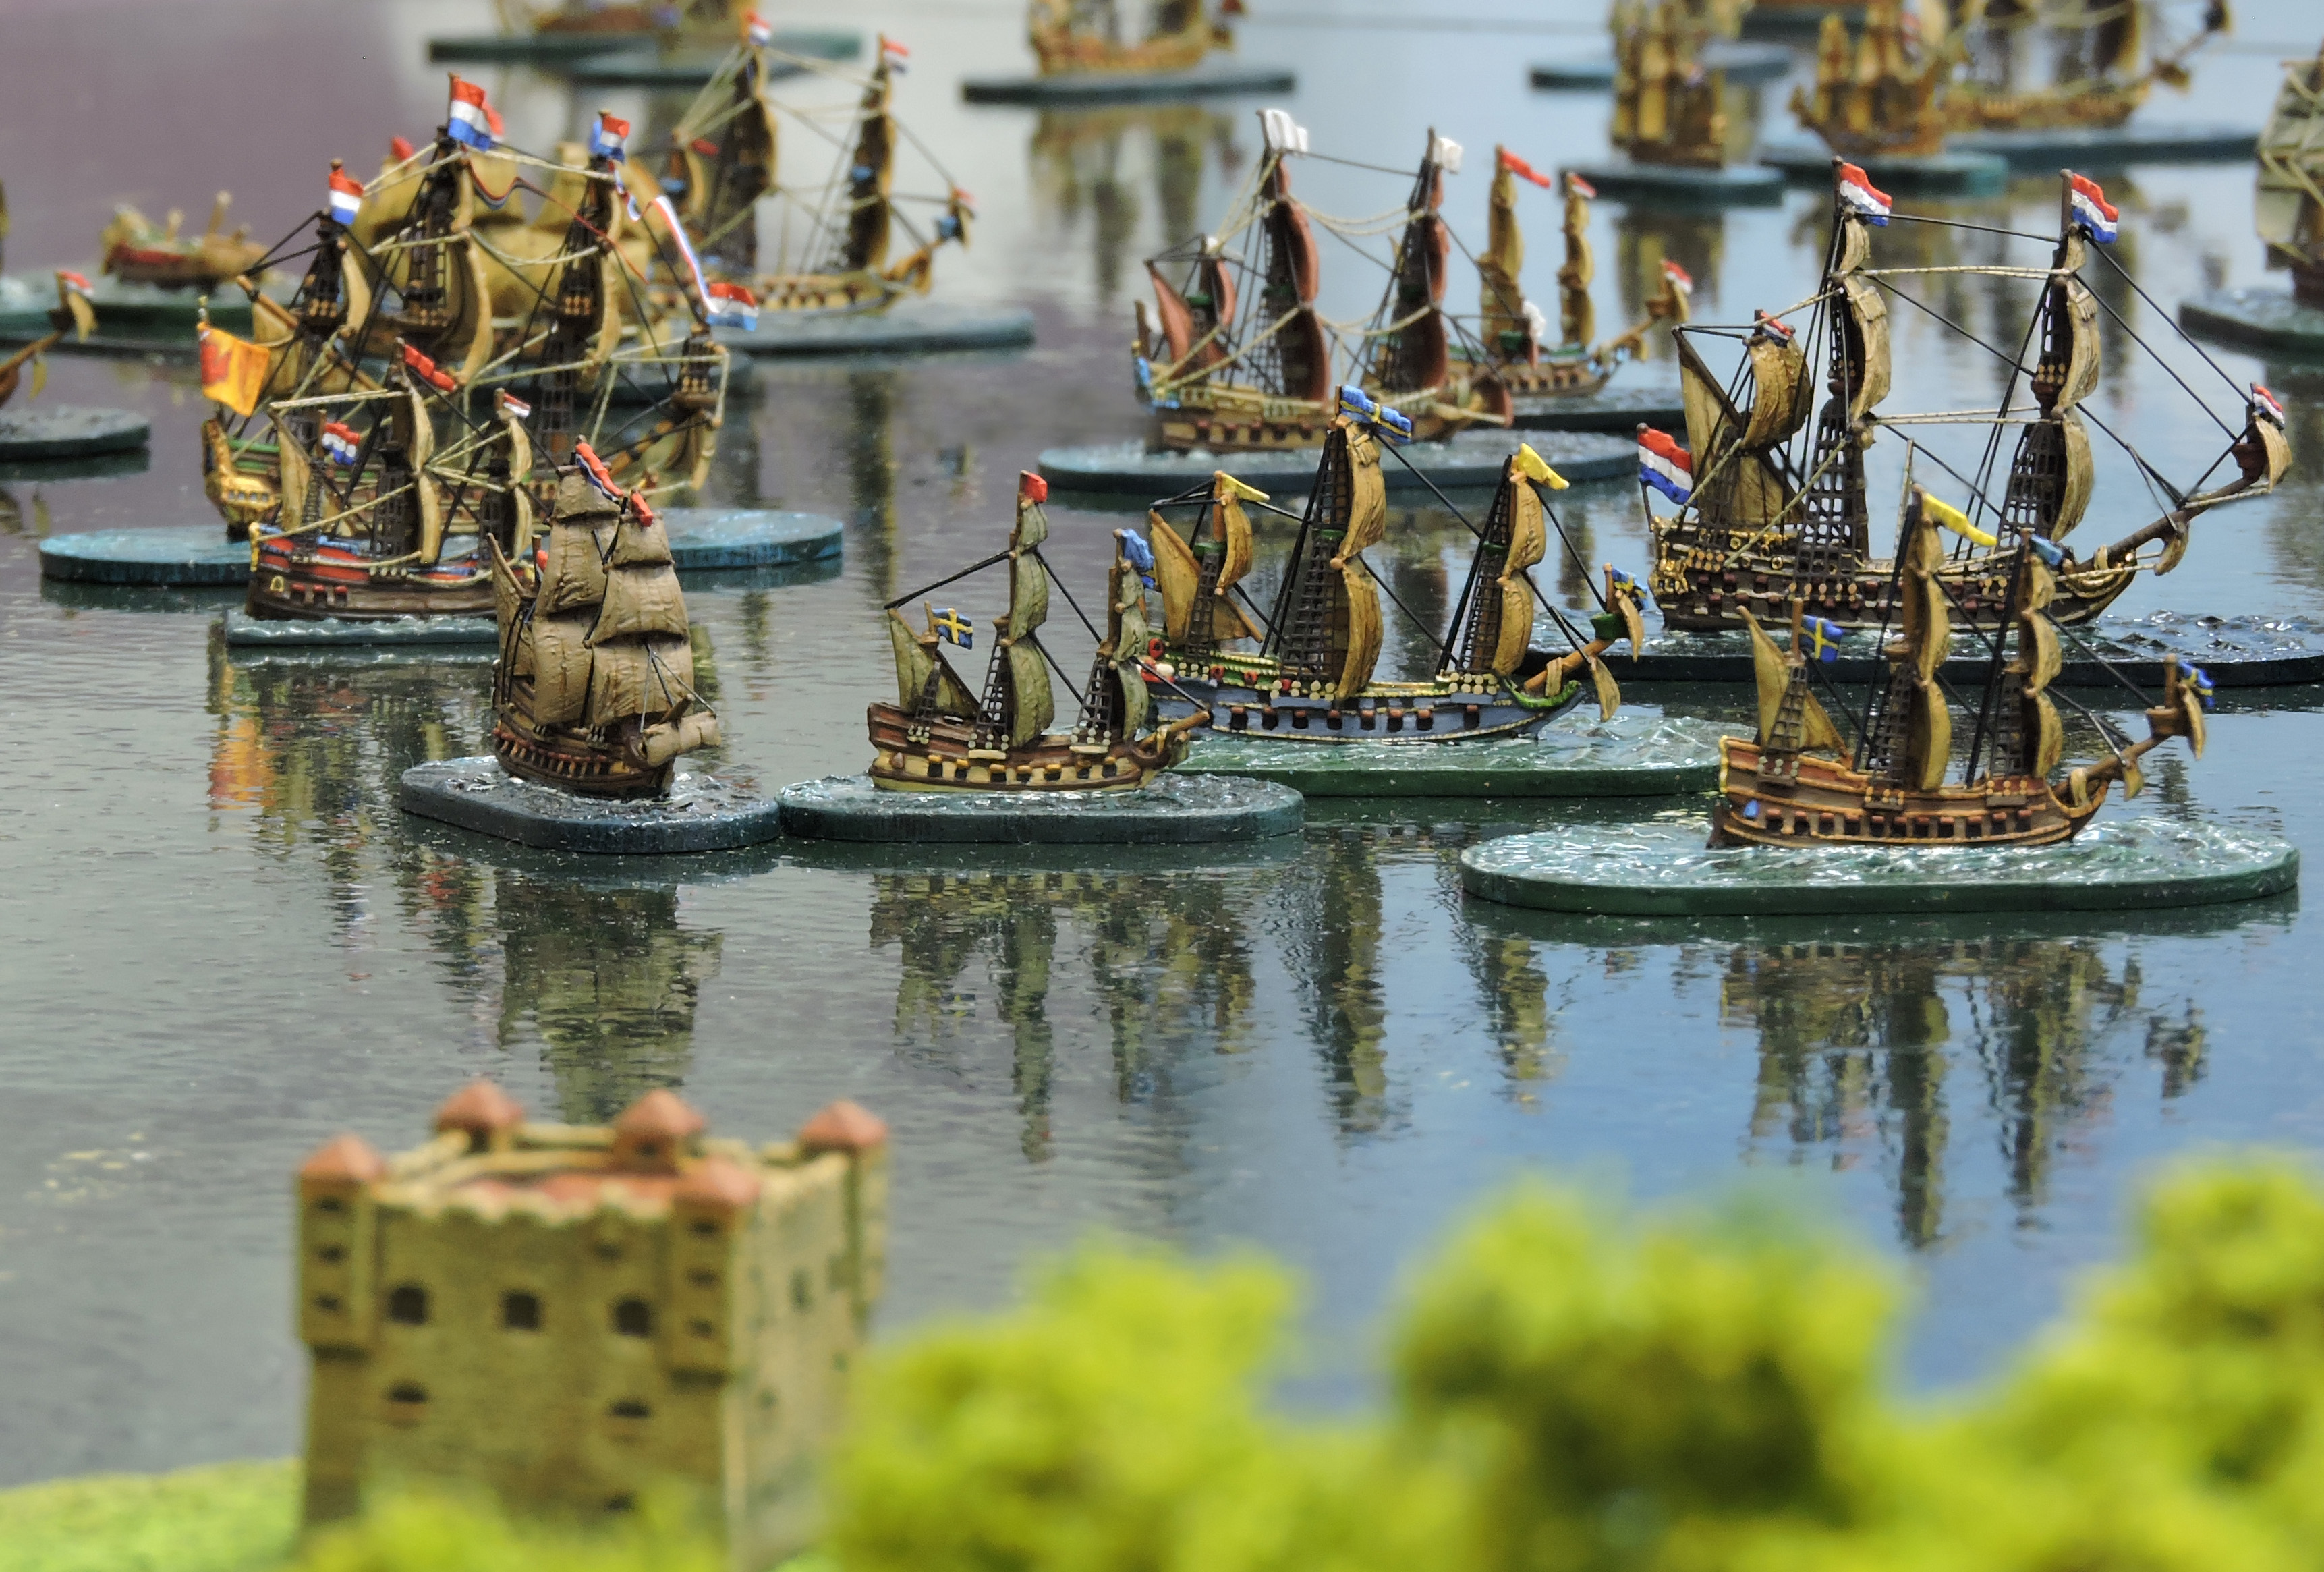
Looking east from behind the British line. Bristol is already detached. |
0638 Pillau ranges in on Argyll, the second weakest of the British ships. Argyll returns fire but the German ship is far more accurate scoring four hits to two. She loses a 6 inch turret to this barrage. Pillau also fires her port torpedo but it misses. Despite her green credentials, Black Prince scores hits on Koenigsberg and Shannon thumps Bremse in an uneven exchange which sees German torpedoes go wide and the light cruiser take significant damage.
0644 The old Danzig fires guns and torpedoes at Argyll. Her gunnery is accurate, knocking out a 7.5 inch gun but the torpedo runs wide. The British attempt to maintain distance and use superior firepower whilst the Germans run close to fire torpedoes and use their shorter range guns. Black Prince once more shows her crew are quick learners by landing four hits on Dresden.
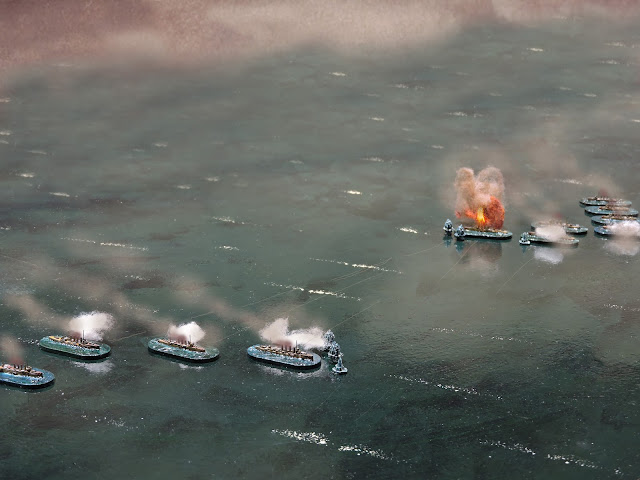
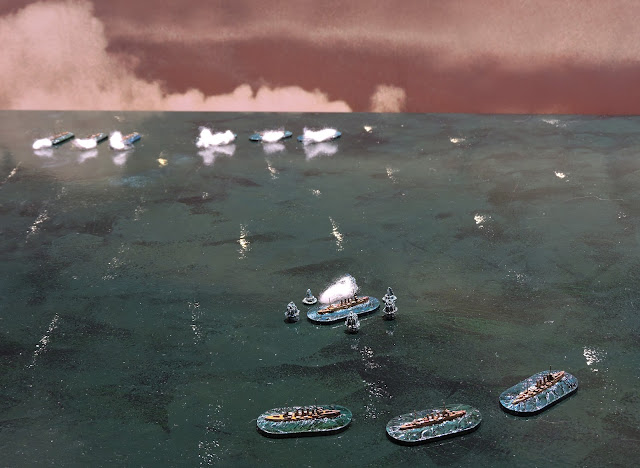
Fire on Bristol! The Germans give her everything they have! (torpedo tracks going wide) |
0650 Bristol, the weakest British ship has become detached from the squadron and find herself exposed about 2,000 yards to leeward of the line. All incoming fire is directed to her and she takes six hits losing a turret and suffering engine damage. This slows her to a crawl in the killing zone. Return British fire almost but not quite, sinks Augsburg which remains afloat, just
0656 Pillau has come about and uses her starboard tube to try and finish Bristol with gunnery and torpedoes. All ordnance shoots wide and in exposing herself in this attack she attracts incoming fire from the British line which almost puts her under.
Bristol at the eye of the storm |
0702 The Germans turn north to extricate the badly damage Koenigsberg, Augsburg and Pillau. Pillau's valedictory salvo knocks out another turret on Argyll but the return fire from Shannon sinks her.
0708 The battle-scarred Bristol limps out of gunnery range and is saved as the Germans disappear northward.
0714 End
The dramatic end of Graudenz |
The British lost no ships, but Bristol was barely afloat at the close, Shannon and Argyll had taken severe damage and Black Prince was also damaged.
The Germans lost Graudenz to gunfire and a torpedo. Pillau was lost to gunfire, Only Bremse, Danzig and Dresden escaped with minor or no damage.
Rules take a little while to bed in but some of the stuff I didn't like so much in the first couple of run throughs I have come to like quite a lot!
Panorama of the icy ending to the scenario |
Last evening, Colin and I played Fog of War – the 4Play scenario for the Battle of Hudson’s Bay, 1697. It is unusual because the fighting takes place amidst the pack ice and in a thick fog. The mechanisms for contact in the fog produce ship disorientation and repositioning relative to other ships.
Initial forces - two ships each |
Bad die throws whilst...
]]>Panorama of the icy ending to the scenario |
Last evening, Colin and I played Fog of War – the 4Play scenario for the Battle of Hudson’s Bay, 1697. It is unusual because the fighting takes place amidst the pack ice and in a thick fog. The mechanisms for contact in the fog produce ship disorientation and repositioning relative to other ships.
Initial forces - two ships each |
Bad die throws whilst navigating the ice can produce rudder damage and inhibit movement and turning. Gunfire results in the rethrow of hits to simulate ‘ghost targets’ in the murk. We laughed a lot and had a wonderfully unpredictable time.
Everyone is sailing in odd directions in the fog. |
All ships have finally arrived - about Turn7 or 8 |
The scenario has two silt shoals thrown in as its near the mouths of the
Nelson and Hayes rivers. Those were the crème in the coffee or perhaps floaters
in the cocktail. The squadrons arrived piecemeal and in different locations so
the whole thing was chaos from the off.
The cheeky Wespe bow rakes Royal Hudson's Bay but the shots missed in the mist!
After about six turns the first gunfire occurred. During 13-16 turns (I lost count), only one English ship and three French fired. The English flagship Hampshire had been badly damaged by dense pack ice before she collided in the fog with the sloop Le Vesp. The Frenchman stern raked her, but was grappled and a spirited resistance by Capitaine Outelas’s crew finally overcome.
oh, oh... what's this? Owner's Love is a what? |
A FIRESHIP! |
A second attack by the little Esquimaux almost succeeded in capturing Fletcher’s weakened flagship, but she too was taken. Racing to the muffled sounds of the action, D’Iberville’s brother Joseph le Moyne in Le Palmier, boarded and captured the weakened Hampshire, retaking the two captured ships and freeing the crews. Colin was surprised by the name of the fourth and smallest English ship Owner’s Love.
A very rare fireship success which goes to prove the rule! |
Esquimaux stern rakes the HBC Dering |
He was even more surprised when she turned out to be a fireship. I was most surprised when her attack on the frigate Le Profond was successful, and her crew were unable to get the fires under control. A rare example of a fireship attack being prosecuted and the growing difficulty of the spreading fire finally getting beyond the ability of the crew to get it under control.
The whole world in a photo - it's all kicking off in Hudson's Bay! |
Having captured two ships, the ice damaged Hampshire is taken by Le Palmier |
This scenario is so unpredictable. I have played it twice with two French wins although both could easily have gone to the English. We enjoyed it so much we are running it again for Dave next week.
END OF GAME PANO |
I get asked that question a lot. Since I have more or less managed to get my butterfly tendencies under control, getting balanced forces on the tabletop has been fairly straightforward. At the weekend, the conversation cropped up again. We were at a seventeen player event featuring two different types of games using a core rules system - One was a SYW and the other ACW. To tactically mirror the...
]]>I get asked that question a lot. Since I have more or less managed to get my butterfly tendencies under control, getting balanced forces on the tabletop has been fairly straightforward. At the weekend, the conversation cropped up again. We were at a seventeen player event featuring two different types of games using a core rules system - One was a SYW and the other ACW. To tactically mirror the periods it is important to have the right balance of 'arms'. Although we had a blast and the games looking stunning, I noticed that the SYW game lacked the requisite amount of cavalry. This resulted in a very slow, linear firefight the output of which minimized player ability by magnifying the arithmetical probabilities and thus, producing a stalemate and a predictable result. This bounced into a conversation with my friendly opponent who remembered jumping into ECW collection, painting loads of Foot and then realizing (too late) how important cavalry was in the period. By that time, the itch had worn off.
So, her are ten tips to getting your forces fighting quickly and feeling right on the tabletop whilst maintaining your mojo.
1. Pick a period that really grabs your interest.
2. Read about it. Not just uniforms and stats, dig into the structure of the armies, the commanders, the political backdrop and how battles unfolded.
3. Choose an aiming point. Don't just say, I'll have one of them, oh, and one of them, and hmm, that is a nice uniform, must do that too. Select a short phase of the war, an incident, a battle, an orbat and work to completing that.
4. Try and get a few games in using someone else's stuff and see if you like it.
5. Paint you troops in proportion. If the ratio of Foot to Horse is 3:1 in the period, complete a cavalry unit for every three infantry. I recommend not leaving the cavalry to be the fourth unit painted, but rather make it the second, or the third. Avoid too much weird and wonderful and build around a core of commonly used types of units, ships, vehicles etc. Try not to get sucked into the vortex of corps level assets supporting platoons which is very common in WW2+ gaming and gaming systems where manufacturers just ant to flog gear.
6. Don't work to massive orbats, you will run out of puff. Pick a small action and get the troops on the table as early as possible. Experience and fun will definitely spur you to get back to the painting desk and get the next unit done. Soon you'll have a brigade, a division, a corps, a fleet!
7. Play some objective based scenarios and avoid where possible, line 'em up and shoot games. Sometimes these are fun but often require equal forces on each side. Scenarios can be imbalanced and fought with minimal forces which means early immersion in the gaming fun. The only reason I started the 4Play scenario series was to meet this need. It obviously hits the spot as I am up to pack number 65 now with a boatload in the pipe. Gamers like fodder!
9. Team up. Working in little groups provides opponents and allies. Forces can be consolidated for bigger games. Do this even if your cooperation is online only. Just having interaction with others really helps to keep the motivation up.
10. Join a few online groups which are relevant but don't overdo it. I recently saw someone wh owas a member of 300 FB groups. A surefire way to get nothing achieved other than a doctorate in voyeurism.
That's it! Works for me.
Let's start with code ARD014 Frigates
This code is one of the most popular in the range. It comprises 2 x 38 gun frigates and 1 x 26 gun. These ships are extremely utilitarian. They can be used from the period of the 1620s through to 1700. English, Dutch, French, Spanish, Portuguese, Venetian, Swedish, Danish, Ottoman, Berber fleets can all deploy them.
In the Martime Nations they would be used for...
]]>Let's start with code ARD014 Frigates
This code is one of the most popular in the range. It comprises 2 x 38 gun frigates and 1 x 26 gun. These ships are extremely utilitarian. They can be used from the period of the 1620s through to 1700. English, Dutch, French, Spanish, Portuguese, Venetian, Swedish, Danish, Ottoman, Berber fleets can all deploy them.
In the Maritime Nations they would be used for scouting, hauling bigger ships out of the line with battle damage during sea battles, colonial policing against piracy, convoy escort, coastal patrol in home waters, raiding, fishery protection, transportation of important people and a variety of necessary tasks. The 26 gun is the optimum size for a large privateer such as a Dunkirker, St Malo or Basque. Caribbean afficionados can put Morgan or Jack Sparrow in a 26. The English fleet usually didn't place anything below a 40 in the battle fleet but the Dutch would use 38s. French privateers often used these ships. Berber pirates had many captured and bought ships of this type. Dutch colonial operations in South America and Indonesia were often protected by these vessels.
If you want vessels which will fit almost any scenario these are they. The hull of the 38 is identical to the hull of the East India 38 in Pack ARD013 except the Indiaman had a rounded bulkhead behind the mainmast and a canvas roof cover over the quarter deck.
ARD015 Galley Frigate and smaller ships
The galley frigates is a 26 gun with sweeps (oars). The English fleet built three custom galley frigates for use in Tangier against pirates. Many other English frigates of 30 guns or less carried oars and had their carpenters adapt the ships for their use. Oars are very useful in shallow waters, river estuaries, calm conditions etc. Other nations would use them too. Berbers would adapt captured ships as sailing galleys. The basic smaller ship is a pinnace (pinas) it has 14 guns but could be used as a 16 or even 20 to bump it into the next gun group. Class it as a category 3 or 4 vessel. This is a typical fleet scout ship or transport for VIPs etc. It is also a classic privateer or pirate vessel. The hull is the same size as the yacht (jacht) in ARD011. These ships are ideal for fireships, small merchants, privateers, river and coastal raiding, harbour protection, fishery protection etc. The version with sweeps combines everything summarized so far for both the galley frigate and pinnace.
ARD16 Armed fluyts
Do not flick past this code!
This is the ship type responsible for making a tiny country like The Netherlands as rich as it is today. Ever wondered about that? The Dutch designed a cargo ship, bulbous at the bottom, thin at the top which avoided sea taxes based on deck width. It is easy to sail so needs very few crew. It moved in convoys with escorts so needed few or no guns maximizing hold space, it had enormous cargo capacity so sold the space cheap and cornered the market. It dominated world trade for nearly 100 years and made the new Dutch Republic rich beyond measure. It really annoyed the English! In time of war the Dutch realized that as they had literally hundreds of these ships they had to convert some to warships. They simply pierced them for cannon. The Dutch fleets from the time of the Sea Beggars in the late 1580s until the massive fleets of de With and Tromp, were composed of dozens of converted fluyts (pronounced flute). They were no match for the English leviathans in a sea battle and so the arms race began in the early 1650s with the Dutch building bigger warships to counter the English threat. Fluyt design was copied everywhere. The English, French, Danish and Swedes all built fluyts. You can use these fluyts for the VOC, GWC, Dutch African Company, Dutch Fleet in the 1st Anglo Dutch War, general merchantmen, convoy escorts, English, French, Venetian, Swedish, Hanseatic, Courland, Danish, Berber or Ottoman fleets. They are the white van of the 17th century. In this pack are 20-24 gun and 14-16 gun versions. Easy to paint, one piece castings.
ARD017 Fireships aflame!
The terror weapon of the seas. Fireships were converted ships usually old, captured, small, or otherwise not required. They had some guns but most of the inner space was reconfigured to carry combustible materials which, when ignited, produced an inferno which was pointed at the enemy and abandoned. They were so feared that ships had equipment and drills to fight them off. The terrorized battlefleets and although their success rate was relatively low, the disruption created and the notable successes haunted sailors. These ships are on fire with flames modelled on. They are of two types a small fluyt and a pinnace. Most fireships were smaller than a frigate. Crews were minimal and they often carried between 0 and 12 guns. Captains were usually attempting some sort of redemption for crimes, misdemeanours or attempting to make a name for themselves. All cultures used them including the Ming/Qing Chinese navy although their version did not look like this!
ARD021 Small merchants and coasters
This pack includes crompsters(cromster) - the smallest squat vessel, hoeker (hooker) with tall mainmast and lateen mizzen, galeas (not to be confused with galeass which is a heavy galley) with tall mainmast and fore/aft rig sail on the main and, a galiot. These could also cover ships called ketches, sloops etc. These are some coastal and short haul cargo ships. Hugely common all along the coasts of Europe, in the Baltic, North Sea and Channel. They would be found anywhere in the world with European colonies. They can be used as merchantmen, fleet victuallers, privateers, pirate ships etc. They are ideal for river and estuary actions. These should cover most pirate fleets.
More in Part 3
]]>It's a while since I have blogged but that is simply because social media and life are not always compatible. Live one, neglect the other! Trying to do both is NO LIFE at all. This post gets to the nub straight away. It is a Noobs guide to the Ark Royal range and its models. It provides, context to the use of each in gaming terms. It may have a few parts as I am writing this off the cuff...
REMEM...
]]>It's a while since I have blogged but that is simply because social media and life are not always compatible. Live one, neglect the other! Trying to do both is NO LIFE at all. This post gets to the nub straight away. It is a Noobs guide to the Ark Royal range and its models. It provides, context to the use of each in gaming terms. It may have a few parts as I am writing this off the cuff...
REMEMBER, many warships of this period survived in service for up to 100 years! They were constantly rebuilt, repaired and modified so the dates are only a guideline to 'get your eye in'
Start at the top...
AR001 - Royal Sovereign and Prince Royal pre 1660.
Royal Sovereign as built |
Prince as a Spanish Manila galleon |
Royal Sovereign is almost unique. Another ship was designed to be a copy and very slightly larger the Sophie Amelia of Denmark. This is the benchmark 1st rate and served through till the late 17th century. She is a massive category 10 vessel in Mad for War. The Prince Royal also survived from her launch in the reign of James I(VI) through various incarnations till the time of the Anglo Dutch Wars. In this form with the 4 masts, she could be used as a large Spanish, Portuguese or Ottoman galleon, a TYW era Danish or Swedish great ship. She is a category 8 or possibly 9 vessel. The beak head is the long prow. These long beakhead ships were rebuilt in the Royal Navy after the 1640s but remained in service long after with other fleets.
AR002 - Royal Sovereign and Prince Royal after 1640s/50s rebuilds.
English 1st rate Royal Soveriegn model |
English 2nd rate - Resolution/Prince Royal model |
AR011 70, 60 and Jacht/Yacht
76 as Prince Rupert's flagship of the 1650s Constant Reformation |
66 as a Dutch flagship |
These ships have gun ports for up to a 78 and 66. This is the standard LARGE battleship code for all fleets - English, Dutch, Swedish, French, Danish. Use in the Spanish and Portuguese navies restricted to after the 1670s/80s. These would normally be classed as 2nd and 3rd rates in the English fleet. The 76 represents the largest size of Dutch ship. The yacht can be used in any navy including privateers. They are fast, carry between 6 and 14 guns and make for good pirate ships. Ships of this size might constitute roughly 30% of a squadron of 9 or 10 vessels.
ARD012 50s and 40s
English 44 gun universal usage from 1630s to 1670s |
English 50 with double reefed sails no top gallant |
English 50 with top gallants |
The 50 gun is of the flush deck, low profile design favoured by navies from the 1650s. She looks small but is packed with guns. The 40 is actually a 44. This is the standard design warship for most fleets in the period up to the 1660s. You can safely use the 44 for every fleet. Remember, ships were frequently captured, renamed and reused in the victor's fleet so ships of English design served in the Dutch navy, French in the English Dutch in English, Danish in the Swedish etc, etc, etc. These ships use the smallest size of masts. There are two types, the masts with 3 sails (upper sail is the top gallant) and masts with 2 large sails which are shorter. These are the double reefed sails(look at the rows of lines on the sails which are gathering points for the canvas). Fighting ships started to prefer the shorted masts and double reefed sails as the period progressed. Left hand ship in the picture above has the two sail, double reefed type. This ships would be classed as 4th rates in the English fleet and make up the majorty of the fighting ships 30-50% in a group of 10. Packs offer an 12a and 12b version.
a = 1 x 50, 2 x 44 with top gallant masts
b = 2 x 50, 1x 44 with shorter masts, double reefed sails.
ARD013
Dutch 66 gun Indiaman serving with the fleet |
Dutch 38, 66 and a 44 gun from pack 12 - captured English ship |
Much of the Dutch fleet in the 1st and 2nd AD Wars was composed of hired ships from the VOC - Dutch East India Company. Many of its ships were bigger than the admiralty ships. This pack represents a large Indiaman (66 guns) and two standard Indiamen (38 guns). These models are essentially the same as the 66 in pack 11 and the 38s in pack 14, but their deck layout is different. They have canvas sun covers on the quarter deck and a curved bulwark behind the mainmast. Use these for Dutch, French, Danish, Swedish and English prizes. Many served in the Royal Navy. The large ship is typical of a Dutch admiral's ship or larger vessels in a battle squadron. The 38s are a Dutch equalivalent 4th rate or large 5th rate.
More in Part 2
The Rapture Gaming Festival happens to be taking place over July 1st and 2nd and one of those days is my birthday. It is being hosted at Chatham Royal Dockyard, a site which I have planned to visit for a long time but never gotten round to. To get to Chatham is about an 860 mile round trip for me.
To go that far takes a little bit of planning, a few days away from home and over a birthday weekend,...
]]>The Rapture Gaming Festival happens to be taking place over July 1st and 2nd and one of those days is my birthday. It is being hosted at Chatham Royal Dockyard, a site which I have planned to visit for a long time but never gotten round to. To get to Chatham is about an 860 mile round trip for me.
To go that far takes a little bit of planning, a few days away from home and over a birthday weekend, there has to be a good reason to do it. I was invited by a fine group of Kentish Men (Postie's Rejects to be more specific) Postie's Rejects to put on my Medway 1667 game, more or less at the site or to be more precise, the objective of the famous Tocht naar Chatham ( Trip to Chatham). This was a social event organized by the navy of the Dutch Republic as a sort of team building, extended 'Away Day' for the fleet.
You know the kind of thing, Kiss me Quick hats, bags of boiled whelks, sink the entire English fleet and be home in time for Van der Valk and some kaas en roggebrood.I thought, if I'm going all the way to Kent, I may as well do as the Dutch did and make is a Scottish version of Tocht naar Chatham, a sort of Celtic Hoolie in Kent.
That's when I thought I'd extend my stay with some visits - Rochester Castle, Upnor Castle, Garrison Point etc. That got me to thinking, what about hiring a boat and inviting a few like minded enthusiasts to take to the water and appreciate the Dutch achievement from the front row.
Now ten of us are going on a private charter from Queenborough to Rochester Bridge and back to take in the key locations of one of the most fascinating naval battles ever seen in Europe. No endless stretches of featureless ocean where ships steamed through never to return. This is an eight miles long stretch of river which saw a predatory squadron of Dutch frigates and fireships, led by their most celebrated admirals - van Ghent and de Ruyter, terrorize the battle fleet of Charles II right on his doorstep. London was emptying as the Dutch lit the blue touch paper.
I have a super week planned - the show for two days, come along and see the Rejects +1 causing Mayhem on the Medway (we might even put on a wargame as well!), followed by three days of sight seeing around the river's key sites all topped off by a trip down the battle field? on the Jacob Marley.
Inspired work of Arnold de Lange |
Come along and throw a few dice at the show.. if yer 'ard enuff!
I'll sink a wee dram to toast both the fleets (whisky? gin? rum? - all three?) and enjoy a week of gaming and exploring. I can't wait.
]]>An opportunity has arisen to take a private chartered cruise boat down the Medway and to the key battle sites of the 1667 Dutch attack on the English fleet. This would involve a trip of between 4-7 hours on a fully equipped large cruiser with toilet facilities, viewing deck and seating. Depending on numbers it may also have limited catering facilities on the day.
The trip would be guided by me...
]]>An opportunity has arisen to take a private chartered cruise boat down the Medway and to the key battle sites of the 1667 Dutch attack on the English fleet. This would involve a trip of 4 hours on a fully equipped large cruiser with toilet facilities, viewing deck and seating. Depending on numbers it may also have limited catering facilities on the day. We leave from Queenborough at 1400 hours on July 5th returning to Queenborough between 1800 and 1830. The cost per head is £150.
The trip would be guided by me with a full commentary on the various actions which took place between June 19th and 24th 1667. During this major battle, the Royal Navy suffered the worst defeat in its long history losing over 30 capital ships.
The Dutch also raided ashore in Kent facing the Royal Scots who garrisoned several strongholds on the anchorage. In their history books it is known as Tocht naar Chatham - The trip to Chatham!
Some of the most important personalities of the age were directly involved in the campaign - Michiel de Ruyter, Cornelis de Witt, Willem van Ghent, George Monck, George Spragge and many others including the King and Duke of York.
The plan is to run the trip between 3rd and 5th July 2023, date to be confirmed. We are likely to depart from a location like Chatham or Gillingham.
We estimate the cost of the trip to be £150 per head. We need expressions of interest pretty quickly to make the appropriate arrangments and secure the boat hire.
I have studied this incredible battle in detail for several years and have been fortunate enough to view the multiple battle site from above as these photos attest. It is an incredible and largely unknown piece of our history and deserves to be understood in a wider context and to a deeper level.
I believe this could be an amazing opportunity for wargamers and those interested in history to view an enormously significant battle site in a unique way.
If you are seriously interested and would be prepared to make a solid commitment to the trip please email me at wordtwister@hotmail.co.uk as soon as possible. We have limited time to organize and plan.
The 4Play packs are to my mind very good value for money with three comprehensive and well thought out gaming...
]]>The 4Play packs are to my mind very good value for money with three comprehensive and well thought out gaming scenarios for less than the price of a pint/0.5 litres of beer. Some people I know can neck that amount of beer in less than 5 minutes so, hours of gaming fun seems like a fair exchange.
Nevertheless, you can't please all of the people all of the time but in an effort to close that infinite gap I have developed a very simple solution. 4PlayONEShot is simply that. A single scenario for a specific game type in the comfortable and easy to access 4Play pack format. ONE game - ONE shot.
Each 4PlayONEShot focuses on one rule type. The scenarios will either fit Beneath the Lily Banners or, Donnybrook/Donnybrook at Sea or Republic to Empire or March of Eagles or, Mad for War.
The style is essentially the same, but each pack will be between 10 and 18 pages long and focus only of the rules set of choice. Of course, the scenarios are adaptable to other rule systems as before.
The first release focuses on Donnybrook and a specific Breach Storming event at Carrickfergus in 1689. To allow everyone a peek behind the curtain, for a limited time, I will give this scenario pack away for free. If you want it, email me at wordtwister@hotmail.co.uk and I'll send it.
These packs take a considerable amount of work to complete. I like to give as much as I can back to the hobby community but I am running a business so, the range will be priced around the £2 per scenario mark when it goes commercial very soon.
I would appreciate feedback on the usefulness of 4Play and its evolution but I reckon the thousands of scenarios which have been taken so far is a pretty good sign.
]]>The campaign covering a single calendar month in 1652 when a small Royalist squadron under Prince Rupert ventured into the Tropics in search of funding sources to continue the king's war to recover his throne, has lasted for several months of real time. We are in the closing few days and the climax is nigh.
I had no fixed plot line for this gaming journey and it has written itself through the...
]]>The campaign covering a single calendar month in 1652 when a small Royalist squadron under Prince Rupert ventured into the Tropics in search of funding sources to continue the king's war to recover his throne, has lasted for several months of real time. We are in the closing few days and the climax is nigh.
I had no fixed plot line for this gaming journey and it has written itself through the decisions and actions of the players and the mechanics used to randomly generate events and encounters.
The legend of a partially submerged Spanish treasury galleon from Manila named Santiago, emerged in the plot during the early stages of the odyssey. Now, as we reach the end, the scenarios focus on Rupert's arrival at the fabled wreck and his struggle to possess it and find any hidden riches.
I started with modest intentions to represent the wreck using a few scraps from commercially available 3D print offers. Those did not meet the need and even though I incorporated tiny pieces from one in an initial attempt at building the bow section, I scrapped it and started again.
What I have ended up creating is completely built from scratch using balsa, dowel, foam core and odds and ends from the bits box. The figurehead has been paint in a representation of St James (San-Tiago). I had to paint this during the construction as I would not be able to gain brush-access on completion.
It is in three separate sections - fo'c'scle, waist and stern, as I wanted the ship to look as though it was submerged up to its waist and moving between each section will necessitate immersion in potentially hazardous waters for models undertaking this activity.
The whole model is of course a pastiche, but based as much as I possibly could manage on a Spanish style galleon of the period 1590-1650. Some features are slightly exaggerated and I wanted the deck areas to accommodate freestanding 28mm gaming figures. As much as possible, it should look strongly representative of a galleon/man o'war of the period.
As the construction was without plan and iterative, I modified and bodged as I went. At the stage reached now, we are pre-painting but almost finished the materials construction.
I already see the potential for other purposes beyond the gaming representation of Santiago.
I have in mind, the rescue of an admiral from a sinking battleship whilst his enemies attempt to capture him in the midst of a sea battle, a three way race by privateers to possess the wreck of a treasure ship in the Caribbean, the desperate defence of a grounded and partially sunk warship by its crew against enemy (possibly native warrior) attack or that of military forces or, Chinese, Omani, Mahratta or other, pirates.
I very much look forward to painting and rigging the model. There will be further updates.
]]>
I started collecting the material for these scenarios over eight years ago and the more I dug, the more I found. I could never decide on the final public sharing of the content in terms of format. I had thought about a book but needed some other supportive content which has ended up in other projects. The success of the 4Play format finally helped me make up my mind and so I am delighted to...
]]>I started collecting the material for these scenarios over eight years ago and the more I dug, the more I found. I could never decide on the final public sharing of the content in terms of format. I had thought about a book but needed some other supportive content which has ended up in other projects. The success of the 4Play format finally helped me make up my mind and so I am delighted to present the first of the scenario packs covering the War in Ireland from a wargaming perspective.
I have used the 4Play format to an extent, but with several key differences. The table set-ups do not have troops in place but rather, map style markers. This provides a very handsome visual representation. I have also omitted the popular After Action Reports and substituted some additional wargaming focused content such as How to choose your units, How to make trenches etc.
This first pack is not from the beginning of the war but from the autumn of 1689 in the period after Schomberg's landing in Ulster. It contains three scenarios, all three can be played with Beneath the Lily Banners although the Newry scenario is written specifically as a grand skirmish for Donnybrook.
The focus of my research was a granular attempt to find and present as many historical battles and skirmishes from the war as possible. Excluding all of the work already published in 4Play for Derry, The Boyne, Cork and Aughrim, I have over sixty finished scenarios equating to at least twenty scenario packs.
November 29th 1689. Battle in Moyry Pass |
Before rushing to complete and issue these (which is a pretty big job), I wanted to test the water with this first release and gauge reaction and appetite. There is another finished - Schomberg's Swansong which I will release over the next week or so.
Here is I hope, the first of many. Titled Lilliburlero! it covers three scenarios in eastern Ulster between September and November 1689.
Stueart's Horse charge Antrim's Regiment in Moyry Pass |
I'd love to hear from users of BLB and 4Play on whether this is hitting the mark.
]]>Being a proud gentleman of Virginia, I decided to focus on events on this side of the Pond. There were small actions all up and down the coast of colonies, but what drew more of my attention were exploits of the pirates, buccaneers, and privateers. Scattered all through the exploits of these sea dogs were small unit land actions that are perfect for Beneath the Lily Banners and Donnybrook! While they weren't painted, I had a pile of lead I'd amassed for pursuing our period into the Caribbean (after Barry's great game I'd attended in the Old Country).
The Battle of Panama featured an army of buccaneer infantry against a mixed force of Spanish uniformed troops, native auxiliaries, poor artillery (some sources say any guns were left to defend the city), two large units of cavalry (extremely rare in this theater), and herd of oxen! Any time I start a collection, I always look for these kinds of mixed forces so avoid the fatigue of painting six identical battalions. I felt like this would be an amazing looking force on the tabletop.
The King of Buccaneers 4Play PDF is 20 pages and includes two scenarios for Beneath the Lily Banners and one for Donnybrook.
The first game is a 4Play BLB assault on the breach of the San Lorenzo fort which guarded the mouth of the Chagres—the route Henry Morgan had chosen for his invasion of Panama. At the time, the fort was a crude affair of earthen walls between timber palisades. I didn't have anything like that in my collection either (sigh), so I set out to build a custom 24x24 inch tile for the game.
The second game is a standard-sized Donnybrook game on a 48x48 inch table. The encounter is fictional ambush as only a token resistance was staged as the pirates hacked their way through the jungle. It represents the Spanish intent rather than actual defense. As with the previous game, I wanted an bit of terrain I didn't have and custom built the ruined chapel for the center of the table.
Temperance stranded on the shoal 6th March |
Too much going on, so unfortunately the blog was a casualty. Everything is good, lots of projects on the go, Warfare Miniatures really busy which is part of the problem! Too much casting keeps me away from many other important things.
Rupert and his French allies failed to capture Temperance |
As a little place holder I thought I would feature the campaign...
]]>Temperance stranded on the shoal 6th March |
Too much going on, so unfortunately the blog was a casualty. Everything is good, lots of projects on the go, Warfare Miniatures really busy which is part of the problem! Too much casting keeps me away from many other important things.
Rupert and his French allies failed to capture Temperance |
As a little place holder I thought I would feature the campaign history of a ship which was initially a bit part player. She was generated by a random event which I thought might come and go but, has become a central plank of the whole story..
Rupert was frustrated by not being able to close in during the first attack. |
Rupert's duel with Thomas Darbyshire |
This attempt failed and the French departed. Rupert and his men tried again the next day and succeeded although he himself was almost killed in a duel with the ferocious master of the slaver Thomas Darbyshire. So impressed by his foe, Rupert offered him a captaincy which he accepted, but to date has been too infirm to be active in. Rupert did run him through twice during their duel!
Temperance (now Mars at right) fighting off Dutch privateers |
No sooner had Temperance been captured renamed Mars and a skeleton crew installed than the two ships had to anchor, backs to the shore to fight off ten Dutch privateers. Mars was captured but during the assault, the Dutch were so enfeebled by their efforts that vacant possession was taken once more by men from Swallow.
Ambushed in the upper reaches Mars is captured |
She sailed to the careenage which the Royalists abandoned to move up river. At Albadar, Rupert fell in wtih Egon Heemskeerke, a Dutch adventurer who claimed to know the location of the lost Spanish Treasury ship Santiago. He bargained with the Royalists for a larger ship to co-lead the expedition and got command of Mars onto which he placed his own composite Dutch and Swedish crew. Heemskerke is an agent of the Swedish Africa Company operating out of the Gold Coast. This mission is thus, a side-hustle.
Up the creek - A Royailst victory but Mars escapes |
Having set out up river the expedition collided with Sicilians who had been operating for some weeks in the upper reaches of The Gambia. Mars was surprisingly overwhelmed by the pirate Occhiali and the Royalists forced to retreat. The 'golden ticket' Heemskerke, was captured and so Rupert had to get him back in order to find the gold which would finance the prosecution of the king's war to defeat Cromwell.
The night attack took the fort but Heemskerke was not there. |
Having regrouped and been reinforced by the arrival of Prince Maurice with the rest of the squadron, the Royalists attacked up a tributary, defeated the Sicilians, captured their flagship and Occhiali but, not Heemskerke or Mars which escaped further upriver with a sloop. The Dutchman was supposedly being kept in a fort nearby. During a night attack the Royalists took the fort but Heemskerke was not there. The remaining Sicilian ships barricaded themselves across the upper reaches of the tributary and now, on the 21st of March, Mars is once more in action and Rupert has to capture her all over again.
And here we are.. March 21st - a cutting out operation in a croc infested bolon. |
The narrow, shallow, crocodile infested bolon cannot accommodate large men o' war so Rupert, Maurice, Captain Robert Fearnes and Master gunner William Babbington are leading about 120 men in a cutting out operation against the broadsides and longboats of the Sicilians..
For now US and Canadian customers can grab...
]]>For now US and Canadian customers can grab a copy from Warfare Miniatures USA.
If you'd just prefer a PDF, you can grab it here.
In the tradition of the old school books Donnybrook Essentials is meant to honor, the booklet has been produced in multiple color covers (colors may vary overseas—the ones shown are what my shop had available). These will be randomly supplied unless you really want a particular color, in which case you can get in touch when you order! The booklet will also come with a matching color card stock play sheet, folded to fit neatly inside.
]]>My introduction to wargaming was with the black and...
]]>My introduction to wargaming was with the black and white booklets, wrapped with cardstock covers and saddle stitched bindings of the 70s and 80s. I love the slick production and beautiful photographs found in modern publications, but I still drag out these old books from time to time—WRG's Wargames Rules 3000BC to 1485AD, De Bellis Antiquitatis, the original Dungeons & Dragons, and many offerings from Partizan Press (including David O'Brien's Skirmish Battles of the American War of Independence).
The old school renaissance in gaming isn't new. There is something very charming about these old books and it's long been an ambition of mine to do something similar.
The day before Christmas, I sat down at my computer to try and get an idea of what an old school version of Donnybrook might look like. After laying out a few chapters, my OCD took over and I was hooked. Over the course of the next few weeks I spent many hours forcing the manuscript into the half-sized pages and madly scribbling new drawings (or reimagining old) with which to crown the tiny volume. Finally, I had a couple of copies produced by a local office supply store.Looking across Øresund |
I have finished refighting the Battle of Øresund, 28th October 1658. It was the largest Mad for War game I have played to date so let's get the stats out of the way first:
Table size: 6 x 4 feet
Playing time: 18 turns (6 hours of battle time) played over three days in multiple sessions.
Scale :1/1200
Model to ship ratio: 1: 2
Number of models used: 50
Total Swedish fleet points:...
]]>Looking across Øresund |
I have finished refighting the Battle of Øresund, 28th October 1658. It was the largest Mad for War game I have played to date so let's get the stats out of the way first:
Table size: 6 x 4 feet
Playing time: 18 turns (6 hours of battle time) played over three days in multiple sessions.
Scale :1/1200
Model to ship ratio: 1: 2
Number of models used: 50
Total Swedish fleet points: 3,603
Total Dutch fleet points: 3,469
Van Opdam's fleet enters Øresund |
The battle was intriguing to play and very difficult to determine the winner until the final tally was made. It ebbed and flowed and contained an enormous number of highlights. It seemed to match the intensity of the historical action in many ways although it was 'free play' and not following any predetermined moves or historical events.
Swedish ships west of Hven |
It had three intense phases of action punctuated by phases of manoeuvre. Turns 2-5, Turns 10-15 and 17-18 produced the bulk of the incidents.
The 32 gun Hjorten opens the battle firing against Zon |
The constrained space of Øresund resulted in an enormously high collision rate particularly for the Dutch and, numerous multiple collisions or 'serial colliders' to be more accurate.
After about 90 minutes the fleets were heavily engaged. A Dutch brander flames at centre. |
The Dutch initially had the windward position but as the battle developed into what looking like a galaxy type spiral, the Swedes eventually (after more than three hours of battle time) gained the weather gauge and the Dutch had come about and attacked into the wind.
Action erupts everywhere |
Not a huge amount of writing in English is available about the battle and although historically considered a strategic win for Holland-Denmark, the tactical outcome was far less clear cut and is often described as a draw or indecisive. The intense battering taken by the Dutch fleet made it almost non operational afterwards although the relief ships did reach Copenhagen.
Swedish ships passing Helsingborg |
A look at some of the outcomes from this refight shows how punishing the action was:
Dutch fleet at close of battle:
10 ships operational
2 burners spent
4 ships crippled or withdrawn due to damage
6 ships exploded, wrecked by gunfire or sunk
2 ships captured or captured and abandoned
Swedish fleet at close of battle:
14 ships operational
5 ships wrecked by gunfire, abandoned or sunk
5 ships captured
The brander Fruytboom is destroyed by gunfire ands explodes |
Ammunition usage:
The Dutch used 30% of available ammunition
The Swedes used 37.6% of available ammunition
Wrangel's Viktoria sinks Windhond behind the smoke at centre |
The surrounding and capture of Strussflycht's flagship Kronan in the dying moments of T18 appeared to deliver the Dutch a victory as the rest of the Swedish fleet sailed south past Hven however, calculation of the points losses painted a different picture:
Dutch losses: 2,231 or 64%
Swedish losses: 1,836 or 51%
This turned out to be a convincing Swedish victory and whether Copenhagen could have received its relief supplies is is great doubt.
Kronan realizes she is lagging behind the fleet as the sharks gather |
I have meticulously recorded every detail of the battle and scenario construction for publication in a 4Play pdf together with some smaller 'vignette' scenarios from the battle to refight. I will release this soon.
Kalmar Kastell is captured by Zeeridder in sight of Helsingborg |
It was great to get the Swedish fleet out and fighting. Its heavier ships did make it more resilient but the Dutch were unlucky in several instances, particularly with the number of bad collisions they suffered. The last being the ramming of Brederode by Eendracht as they clambered to capture Kronan. They had mistaken her for the fleet flagship Viktoria and saw this as a battle winning combat. Interestingly, as in history, the Dutch Admiral Floriszoon was killed in the battle although the cantankerous Witte de With - survived, only getting into action in the final two turns of the marathon!
King Karl X's view from Kronborg (Elsinore) |
..every day and every night... In the words of Glasgow's own Frankie Miller Be good to yourself
I promised myself a northern waters game last Christmas, it was going to be Öland but that never took place because the lurgy got me and it nearly did it again this year, however... this hobby of ours is a powerful stimulus. So, sick a bed, I planned this...
]]>
..every day and every night... In the words of Glasgow's own Frankie Miller Be good to yourself
I promised myself a northern waters game last Christmas, it was going to be Öland but that never took place because the lurgy got me and it nearly did it again this year, however... this hobby of ours is a powerful stimulus. So, sick a bed, I planned this one and got it on the table today for playing over the next couple of days.
Swedish ships sail into the Sound |
It is the biggest 1/1200 scale Mad for War game I have yet attempted and it has intruiged me since I first learned about it. Protecting their own commercial interests and access to the Baltic, the States General has sent a fleet under Jacob van Wassenaer van Opdam to relieve Copenhagen then under sige by King Karl X of Sweden. To relieve Copenhagen the Dutch fleet had to push aside a larger and heavier gunned Swedish fleet under Rijksamiral Karl Gustav Wrangel.
van Opdam's Eendracht leads the fleet into battle |
The battle is know in English as The Sound and it took place on October 29th 1658. It is appropriate to give it the proper name Øresund or Öresund. It was one of the hardest fought engagments of the period contained in an area less than 10 miles across and six deep. On one side was the coast of Denmark and the other, the cost of Sweden. the island of Hven sat right at the southern tip.
Karl X has already captured Kronborg Castle in the foreground - Hamlet will be doing grave flips |
The Dutch fleet of 41 ships in three divisions faced a Swedish fleet of 45 in four divisions. I have worked out an order of battle using 24 ships on each side with the Swedes having a superiority in guns and points as can be seen in the accompanying photos.
Eendracht leads the centre division |
Let's see how I get on with this beautiful looking game which pits two proud Protestant nations against each other with two others looking on.. the beseiged Danes and an English Commonwealth fleet observing from just close enough to remain neutral. This barely eighteen months before the Restoration of the monarchy in England and involves many major naval actors of the period.
One of the crossing points - hostile locals are present |
This one has got to be one of the more unusual scenarios from an unusual campaign. Survivors from the scuttled treasury ship Santiago are attempting to reach civilization in the lower reaches of The Gambia. Crossing a monster infested bolon was not in the plan.
Harassed by native warbands lurking in the shadows just beyond the narrow trails,...
]]>One of the crossing points - hostile locals are present |
This one has got to be one of the more unusual scenarios from an unusual campaign. Survivors from the scuttled treasury ship Santiago are attempting to reach civilization in the lower reaches of The Gambia. Crossing a monster infested bolon was not in the plan.
Harassed by native warbands lurking in the shadows just beyond the narrow trails, slowed down by the Bishop of Manila (en route to Europe by the westward passage) and his possessions, thirsty and hungry from the toil, lost and disorientated by the dense jungle canopy which prevented obtaining a proper bearing, the survivors of Santiago made heavy going of their jungle ordeal.
Getting across was by leaky boats or discarded floating rubbish at the slaving post |
Twenty nine began the mission to cross the nameless but deadly bolon and around twelve made it safely across avoiding all sorts of terrors on the way.
Sergento Arturo Hernandez earned a place later in the campaign story with his heroics |
This game was played on a 2 x 4 board. It took us about two hours to play and was very interesting. Enemies and animals were generated using Donnybrook and a table grid.
El Obispo de Manila, wasn;t praying hard enough. He was capsized and eventually crushed by a hippo
Dave and Colin managed to get some of the Spaniards across. Alas, El Obispo de Manila was not amongst the lucky ones. Several fell prey to crocs and hippos. The game will appear in a 4Play pack soon.
]]>Royal Sovereign |
Royal Sovereign |
Small warships ARD015 |
Frigates ARD014 |
Cromwell's Navy |
Dutch Fleet 1630-1650 |
First, let me thank you all for your patience. We have been promising this book for over eighteen months. Why it took so long does not matter anymore. It will be delivered to Warfare Miniatures HQ before the end of January 2023 for immediate distribution.
A shipment will go on to Warfare USA the day after it arrives on my doorstep. Orders for the USA, Canada and US Territories should be made from...
]]>First, let me thank you all for your patience. We have been promising this book for over eighteen months. Why it took so long does not matter anymore. It will be delivered to Warfare Miniatures HQ before the end of January 2023 for immediate distribution.
A shipment will go on to Warfare USA the day after it arrives on my doorstep. Orders for the USA, Canada and US Territories should be made from Warfare USA. Orders from all other countries should be made from Warfare Miniatures. We would expect the order to be with you within a few days of us receiving the book here if you choose the fastest postage option for your location.
Mad for War is just under 200 pages, full colour throughout and printed in hardback. It covers naval warfare from 1620 -1730 but that is easily extend back to 1550 and forward till around 1750. It contains full rules for square rigged and lateen rigged/galley fighting. It is aimed at scales between 1/2400 and 1/600 but could be used for other smaller and larger scales. Battles from single ship duels up to squadrons of more than 20 ships can be handled.
The book is packed with an enormous spread of content as can be seen from the shot below. All photos and artwork are original with no stock pictures used.
The price is £35 (North America $45US) ex postage.
You can PREORDER HERE: MAD FOR WAR PREORDER LINK
In North America PREORDER HERE: WARFARE MINIATURES USA
If you are new to Mad for War then buying it is easy! Just pr-eorder and we'll ship when it arrives with us.
Mad for War Essentials Customers - Please read this
If you were one of the several hundred people who bought the Mad for War Essentials pre-release version please read this carefully:
We promised the £5 paid for Essentials would provide a discount if the main book was purchased. We have the names of every Essentials customer so you are guaranteed not to miss out.
You now have an TWO options when ordering from the League of Augsburg shop (if you ordered Essentials from Warfare Miniatures USA, you already received a discount code in your email):
1. Preorder the book as normal. Then, send an email to wordtwister@hotmail.co.uk and title the mail:
Mad for War refund
and we'll Paypal you back with a £5 refund if your name is on the list of Essentials customers.
OR
2. Preorder the book as normal. Then, send an email to wordtwister@hotmail.co.uk and title the mail:
Scenarios Offer
You can choose ANY THREE Mad for War 4Play scenario packs. Just name your choices,and we'll send those straight to you BEFORE THE BOOK IS RELEASED. These are priced at £4.00 EACH so you will effectively receive £12 worth of outstanding Mad for War gaming options for the £5 you originally invested in Essentials. There are currently 17 packs to choose from with more being released on a regular basis.
Somes examples:
Prince Rupert captures ships should be the byline here. Three Donnybrook/Donnybrook at Sea scenarios from down on the Gambia. The main man does incredibly well on the whole....
Colin has been coming to terms with his role as Prince Rupert in our currently running Gambia 1652 campaign. I believe Colin is coming to know and love the prince and has now taken to making decisions as if he were the man himself. Those of you who know Colin (possibly by his nickname of CKC - Colin Kills Colonels0 will recognize him as a...
]]>Colin has been coming to terms with his role as Prince Rupert in our currently running Gambia 1652 campaign. I believe Colin is coming to know and love the prince and has now taken to making decisions as if he were the man himself. Those of you who know Colin (possibly by his nickname of CKC - Colin Kills Colonels0 will recognize him as a level headed and balanced individual who normally sees both sides of the argument.
Defiance and Fortune face the slavers |
His talent for getting officers killed is often happenstance and not a deliberate attempt at derring-do. In the most recent battles of the campaign however, he has played the prince to perfection He had Rupert scale the taffrail of a slaver whilst all of his accompanying men fell into the Gambia. Over perhaps 15 rounds of close combat the prince cleared the decks, duelled with two officers and captured a 26 ship almost unaccompanied. He helped Rupert fight off ten Dutch privateers whilst at anchor resulting in the taking of three prizes.
The Alhulandiu (The Dutchman) a captured vessel used by the Moroccans |
Last night, well.... He chose to swing the Princeon a rope from the deck of the sloop Defiance onto an Arab slaving dhow without support. He captured it by killing some crew and then holding a sword to the throat of the master in full view of two other slaving ships which promptly surrendered lest the suffer the same fate.
Colin IS becoming Rupert!!! Here is an extract from the camapign narrative
These laddies mean business - a salty looking selection of Moroccan slavers |
The English had the weather gauge whilst the Arab ships were being carried by the downstream current. As the distance shortened Rupert was able to determine them as a dhow, a bulkier merchant and a smaller European-style sloop. Almost from the moment they were within range musketry commenced from crowds of men in the bows of both groups of vessels. The southern channel was notoriously silted up and soon Brooks had run Fortune aground where she remained lodged for the entire engagement. No sooner had the central Arab ship gotten within range tan she ran aground quickly followed by the the smaller ship. On the dhow whose crew had shot two of Marshall’s men at the wharf remained mobile
The dhow Cubra is about to collide with Defiance
and it quickly closed with Defiance. For some time, the musketeers of both sides exchange a hot fire during which many fell. Attempts to re-float Fortune failed but both Arab vessels did sail free eventually only for the wind to change to west by north west forcing them to move into the wind and make almost no headway even in the current. The commander of the slaving flotilla was aboard the dhow Kubra. He recognized his opponents as English and having been behind the shootings at Albadar, he knew the only way out was to fight through. He set his vessel to cross the bow of Rupert’s ship but as the English sloop closed, they collided. Kubra fired off her light cannon to little effect and the crew poured musketry fire at each other with some effect as the vessels ground alongside. From nowhere,
It's THAT man again. Rupert is the only Royalist aboard the dhow and begins clearing it
Rupert grabbed a trailing line and swung across the gap between the ships. Eyewitnesses attested that he landed, on the prow, sword drawn and attacked the musketeers crowded there. He killed one man and began to fight the rest. On seeing their prince evince such fearlessness, the English crew grappled Cubra and others followed Rupert across. Soon, a furious fight was underway on the narrow and crowded deck of the dhow. The English appeared to have the upper hand although the enemy offered stout resistance and as losses mounted, they were encouraged to persevere by the barked orders of Mohammed Ait, their leader. English losses mounted but in a series of individual duels they began to gain the upper hand.
Fortune remained glued to the shoal and her losses mounted as both enemy vessels concentrated musketry fire upon her. Brooks feared that he must soon yield but was saved by the contrary winds which prevented the enemy vessels from coming close enough to board. Back aboard Cubra, Ait himself drew his sword and wove through the scrum of deadly contests to charge at Rupert. The prince parried a potentially fatal thrust but was matched by the seasoned slaving master.
They skilfully cut, thrust and blocked each other until only they continued to fight. The remaining six Arabs had begged quarter and stood weapon less amongst the bodies of their comrades. At that point Rupert moved like lightning, seized Ait and placed a sword to is throat in full view of the other two slaving ships. The intent was clear and both masters signalled that they would resist no further. Single handed, Rupert had won he battle repeating his heroics in besting Darbyshire and capturing Temperance some days previous.
]]>The Navigation Act was a piece of legislation designed to annoy the Dutch and wrest back some control over the global movement of trade commodities from the commercially adroit GWC/VOC and trade bodies of the Dutch Republic.
T2. The faster English ships break away from Rainbow. |
It went a considerable distance in starting the 1st Anglo-Dutch War as the...
]]>The Navigation Act was a piece of legislation designed to annoy the Dutch and wrest back some control over the global movement of trade commodities from the commercially adroit GWC/VOC and trade bodies of the Dutch Republic.
T2. The faster English ships break away from Rainbow. |
It went a considerable distance in starting the 1st Anglo-Dutch War as the Commonwealth Navy used it as an excuse to stop and search pretty much anywhere on the high seas.
T2. The English try and form a line as the Dutch forge on. |
Cargoes were to be carried to and from English colonies and British ports in 'English bottoms' ie in the holds of English ships and not foreign ones. The amount of money the Dutch were coining with their commodious, low-crew to burthen ratio fluyts was driving the English to distraction and financial ruin. Convoying was already well established and although the Dutch admiralties were as bureaucratically heavy as any institution, the hiring of reasonably strong protection from the VOC or even privateers, was compensating for a lack of large naval warships and demonstrated once more, Dutch pragmatism.
T3. The line is formed and the battle is about to commence. |
Rupert's escapades in the Tropics were set against the backdrop of the Navigation Act. Probably, if the Royalists had been in power they would have implemented something similar but in event, this was Cromwell's problem. The Royalists were succoured to an extent by the House of Orange which was anti-Republican. So Rupert I am certain would have enjoyed some schadenfreude on the issue.
T4. Widespread outbreak of gunnery |
One of the most enjoyable scenarios I have run during the ongoing Gambia campaign is an encounter between George Ayscue's Barbados Squadron, newly back across the Atlantic from the Caribbean and an inbound VOC convoy from the Far East. Ayscue is actually looking for Rupert but instead finds the Dutch and must invoke the Navigation Act.
T7. Captain Jan Pelsaert is killed when Schiedam is hit by a broadside from Increase |
His flag is in an Elizabethan era rebuild Rainbow. The rest of his squadron is composed of hired merchants except one Swedish-built ship captured from the French about 18 months prior. He is attempting to arrest the progress of seven VOC ships led by a very powerful 48, Vogelstruis (Ostrich).
Schiedam has fought off Increase and is moving north again. |
The English have the weather gauge riding on a brisk westerly. The Dutch have refused to stop so, there is going to be some shootin'.
T10. Vogelstruis is on fire after being hit by Amity and Rainbow. |
These pictures show the action unfold and demonstrate that to mix it on the open ocean, you need well-armed, superior crewed, weatherly ships!
Both deal with non European dimensions to the wars of major European powers and concentrating on North America and the Caribbean. Each provides a wealth of information and enough wargaming fodder to keep scenario writers like myself in copy for years.
Childs's book has a narrower scope than that of Chartrand, focusing on the northeastern colonies and the landownership disputes, alliances and betrayals, raids, counter raids and massacres which characterized the English ascendency in 'New England'. The wargaming possibilities lie mostly in skirmish gaming and for those who love that genre, the opportunities for drama and surprise outcomes from the earliest days of the century until the latter part of Charles II's reign are legion. The book is well written and highly readable although I would have preferred a few originL colour plates and less reliance on Victorian/Edwardian era illustrations. Overall, a great addition to the canon of work now aiding the 17th century wargaming community towards its goal of never-ending tabletop possibilities.
I have had the privelige of sharing an expert panel platform with Monsieur Chartrand at Historicon some years ago. He continues to feed the hungry mouths of the gaming community with scholarly work focusing on the Kingdom of France and its military efforts both in Europe and its overseas dominions. This book is a monster, absolutely jammed full of detail for land, naval and amphibious gaming possibilities. The colour plates are in the warm and gentle style of Patrice Courcelle and together with a further extensive collection of colour illustrations towards the rear of the book, offer a rich visual enabler to the text. At 300 pages, this book is literally and metaphorically heavyweight and offers a refreshingly non Anglo-centric perspective on the campaigns fought in the Caribbean during the stated period. It does not ignore the all important naval elements and the focus on buccaneers is most welcome.
Books are not cheap these days but my perspective is this -no one thinks twice about buying a few pints of beer in a week or if you are addicted to the weed, a couple of packets of those. These books will last a lot longer, are much better for your health and will inspire you rather than make you cough or want to wee a lot!
The first two scenario packs from the Gambia Campaign 1652 are now available in the shop. More will be released before Christmas so keep and eye out if your imagination has been stimulated by this fascinating wargaming opportunity. See the pdfs here: https://www.leagueofaugsburg.com/shop/products-subcat-84.html
' |
Two Arab slavers observe the advance of 'al ainjiliz' through the jungle |
The first 'full scale' land battle of the campaign is about to be fought thirteen days of 40% of the way through. 200 English sailors accompanied by Berber PoWs now incorporated into Royalist ships' crews and some local Christian African villagers have moved inland to raid the Komban Royal enclosure.
Prince Rupert had...
]]>' |
Two Arab slavers observe the advance of 'al ainjiliz' through the jungle |
The first 'full scale' land battle of the campaign is about to be fought thirteen days of 40% of the way through. 200 English sailors accompanied by Berber PoWs now incorporated into Royalist ships' crews and some local Christian African villagers have moved inland to raid the Komban Royal enclosure.
Prince Rupert had conveniently shifted 200 Komban warriors to the far shore of the Gambia a week earlier on a mission into disputed territories and then, abandoned them to pursue a grounded Parliamentarian slaving ship. Meanwhile, his younger brother has picked a fight with the remaining Kombans on the south shore for failing to provide promised victualling to the fleet.
Having hung a few hostages as encouragement and beat off a punitive attack on his careenage, young Mauritz is heading overland to raid the Komban 'palace'. He's even had his men drag a ship's gun with them on a sledge as encouragement.
Crew from Constant Reformation (V02 & V03 codes from Warfare Miniatures) |
Facing him is the remainder of the Komban warrior contingent backed up by local Muslim workers who are part of the Arab slaving operations in the area and some Arab slaving crews who see the English as a pestilential problem to be eradicated.
Scenario is in this 4Play pack |
This is a binary outcome engagement for the Royalists - win and they get lots of food and water. Lose and its back to meagre rations and sour water at the careenage.
screen grab from #5 All Ashore! which has 38 pages |
Working on five so far and we are just past the one third mark of the campaign. The actions have come thick and fast and have divided into clear groups - naval actions using Mad for War, small naval actions using Donnybrook at Sea and land actions using Donnybrook. Looming up is a small land battle for which we'll use Beneath the Lily Banners.
Th...
]]>screen grab from #5 All Ashore! which has 38 pages |
Working on five so far and we are just past the one third mark of the campaign. The actions have come thick and fast and have divided into clear groups - naval actions using Mad for War, small naval actions using Donnybrook at Sea and land actions using Donnybrook. Looming up is a small land battle for which we'll use Beneath the Lily Banners.
The scenario packs can be played out individually without having to play the campaign. They are written in such a way that players can create individualized versions of the scenarios and not simply follow what we have done.
I am also going to finalize and edit the whole campaign narrative as a sort of companion. I would hesistate to call it a novel, rather, the story of what we did. In addition, I will publish the campaign mechanics which made it all work.
So here is a taste of what is coming.
waterfront at Albadar |
The Gambian Odyssey continues unabated. Running low on all sorts of supplies Captain Marshall of Honest Seaman has been sent to Albadar, the Couronian trading post to gather intel, supplies and collect Doctor Mautrin, Rupert's personal physician. Things go awry when his shore parties clash with locals, the French privateers and discover Mautrin and eight of the ship's company...
]]>waterfront at Albadar |
The Gambian Odyssey continues unabated. Running low on all sorts of supplies Captain Marshall of Honest Seaman has been sent to Albadar, the Couronian trading post to gather intel, supplies and collect Doctor Mautrin, Rupert's personal physician. Things go awry when his shore parties clash with locals, the French privateers and discover Mautrin and eight of the ship's company are missing.
Here is an extract from the history of the campaign
By mid-morning on March 11th, Marshall became aware that a party of his men had gone missing ashore and of an incident at the quayside during which Frenchmen had thrown night soil at his men resulting in a brawl. Having completed his business with the Couronians, he sent word to the ship to dispatch a reinforcing party whilst he split his detachment to search for the missing men and in particular, the doctor Stephen Mautrin whose services were sorely needed at the careenage. During the search they encountered various groups including a band of Mandinkan warriors on the outskirts of the settlement, but none would admit to knowing anything about the whereabouts of the missing Englishmen. Mautrin was already well known despite only having been in town for a few days. A man
Captain Marshall and his party
of habit, he had taken to a regular table at the largest tavern, frequent visits to a popular bawdy house and dining with the Couronian comptroller Valdis Liepins on more than one occasion. His vanishing was the subject of some idle gossip but most who knew of him had assumed he was back aboard ship. Marshall’s men became less circumspect as the fruitless search continued. This was doubtless an indication of their frustration, the heat and being subjected to abuse by local urchins paid pennies by the French privateers to antagonize the arrogant Anglais. An awkward public confrontation with Verot during which he was all but accused by Marshall of abducting the doctor was abruptly cut short when a drunken mob spilled out of the tavern and began berating the English for disturbing the peace.
Walkin' into Clarksdale (er... Albadar). One for the Zepheads
Blows were exchanged and a running street battle developed as more people surged into the shabby main square. Several revellers had their heads broken and two Englishmen were knocked to the ground. The crowd swelled, French privateers stood by, laughing at the comedic antics but with hands on their sword hilts as a precaution. The drunks became wilder and more unruly and three were killed when things turned sour. The ringleader had accosted the priggish Marshall who promptly drew a pistol and shot him through the forehead. The Couronian town guard which until this point had been looking the other way, was compelled to intervene. Marshall was politely but firmly requested to return to the quayside under the protection of Liepins’s men.
A tense moment as English sailors pass an Arab slaver
The alternative was an undiplomatic and very public arrest. The Englishman reluctantly complied but insisted that several buildings had yet to be searched having explained to Liepins about their lost chirurgeon. The comptroller reassured Marshall than his men would sweep every building and report back as soon as the activities were concluded. All appeared to be returning to normal until the rambunctious throng reached the quayside. An Arab slave ship lying nearby had raised the suspicions of Marshall’s reinforcements, recently arrived from Honest Seaman. The master had given short shrift to enquiry about the whereabouts of the missing doctor. A warning shot was fired over the heads of the Englishmen and a tense standoff developed. The situation deteriorated rapidly with the surge of humanity onto the wharf. Nervous crewmen aboard the slaver opened fire and two of Marshall’s men were killed. Uproar ensued and the Couronians boarded the slaver, arrested the master and the shooters then confiscated the vessel. The English bundled their wounded into the boat and returned to the ship. A letter from Liepins to Marshall later in the afternoon noted that no Englishmen hale and hearty or otherwise, had been found.
Call out the (Couronian) Guard! Governor Liepins watches on. |