The year is 1666.......
Getting more used to the rules, having added in some of my own detail and generally loving the game play, I decided it was time to get a bit more ambitious with the Dutch Wars naval action.
I now have enough ships painted and had so far resisted putting anything larger than a 3rd Rate on the table but that self-denying rule is now by the boards.
This battle was a surprise in that I thought it would last longer than the 15-18 turn games thus far played. Not a bit of it. It was done and dusted by the end of Turn 6. It was carnage from Turn 2 and the result was not as anticipated.
It is a pretty straightforward action set somewhere off the Suffolk coast. A raiding squadron of Dutch warships in search of prey is unfortunate enough to run into a powerful but numerically inferior group of ships of the English Red Squadron.
The objective is to vanquish the enemy! .
DUTCH Squadron
Battle Division
De Zeven Provincien - 2nd Rate, 84 guns, Veteran crew, Speed - Slow FLAGSHIP
Groot Hollandia - 3rd Rate, 64 guns, Veteran crew, Speed - Medium
Harderwijck - 4th Rate, 54 guns, Drilled crew, Speed - Medium
Vrede - 5th Rate, 46 guns, Drilled crew, Speed - Medium
Fireship Division
Rotterdam - Fireship, Drilled crew, Speed - Medium
Susanna - Fireship, Drilled crew, Speed - Medium
Wapen van Londen - Fireship, Drilled crew, Speed - Medium
ENGLISH Squadron
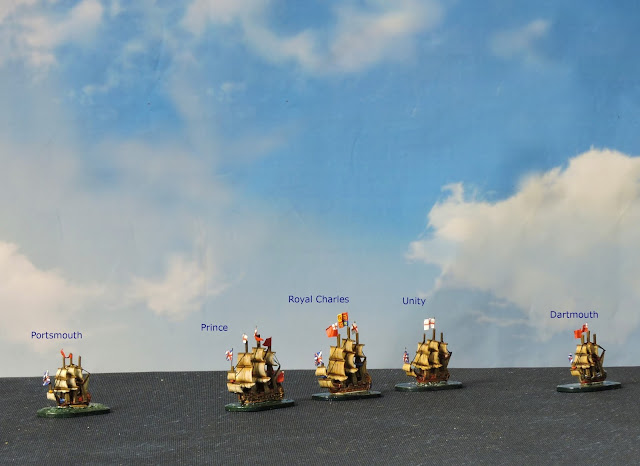
Battle Division
Prince - 1st Rate, 92 guns, Veteran crew, Speed - Slow
Royal Charles - 2nd Rate, 80 guns, Veteran crew, Speed - Slow FLAGSHIP
Unity - 4th Rate, 54 guns, Drilled crew, Speed - Medium
Independent commands
Dartmouth - 5th Rate, 40 guns, Drilled crew, Speed - Medium
Plymouth - 5th Rate, 40 guns, Drilled crew, Speed - Medium
The English held the windward position but both commanders had equal ability meaning neither gained advantage for initiative. As it happened the English admiral won the initiative in four of the six turns including the first.
As the Dutch were sailing towards the coast from a north easterly direction they had to steer a course between two islands to gain the open coastal waters beyond. Both sides used strategic movement in T1 but the independent English 5th rates made great speed and so the remarkable battle fired up from the outset.
HMS Portsmouth with the wind to her back sailed right across the channel and was able to rake the Dutch flagship with an astonishing first broadside. She scored six hits which caused a 'catastrophic damage' check on De Zeven Provincien. This resulted in the flagship's steering gear being shot and the rudder jammed dead ahead which meant for the entire battle her course was set!
The Dutch won the initiative on T2 and used it to throw their Battle Division forward. The flagship had no option but to steer dead ahead but the following ships turned to starboard to brings their guns to bear on the enemy. The Fireships also bore to starboard to squeeze through the channel into the open water whilst the English battle line turned to port veering away from the channel.
With the English also winning the initiative on Turn 3 and many ships cramming around the tight channel three spectacular events occurred. HMS Dartmouth had raced to box in the line of fireships trying to sneak into the open water. She raked the lead vessel Rotterdam at close range causing at catastrophic damage check.
The highly combustible fireship exploded and vanished in a matter of seconds. Simultaneously, the formidable HMS Prince was subjected to heavy fire from three ships causing her magazine to explode and rendering her partially disabled. The unmanouvreable De Zeven Provincien had no option but to plough straight into HMS Portsmouth causing terrible damage, demoralizing her crew and killing her captain in the process.
Things were not going to plan for the Red Squadron but on T4 the initiative again went to the English who had to work hard to try and protect the damaged HMS Prince.
The Dutch Battle Division left the flagship to disentangle itself from the now sinking HMS Portsmouth and tried to cut the enemy line in front of HMS Royal Charles.The fireship Susanna attempted to attack the English flagship but was easily fought off. The English crew in turn grappled the smaller ship, boarded and captured her. Susanna had already been abandoned by her crew. Every Dutch ship passing the stricken HMS Prince shot into her forcing the giant to strike her colours having been reduced to a wreck.
The Groot Hollandia came alongside HMS Royal Charles, both intending to board each other but the Dutch 3rd rate had the initiative and attacked the English flagship. In a fierce back and forth combat the English marines prevailed and the Groot Hollandia was taken and quickly cut adrift with a small prize crew aboard because De Zeven Provincien was looming through the smoke astern of the English ship and on course to smash into her on account of having no control of her steering.
The Dutch at last grasped the initiative in T6. De Zeven Provinicen crunched into the stern of HMS Royal Charles further damaging both vessels. They grappled and the Dutch boarded the English ship capturing it in a lightning move which saw a dice differential of 7 points meaning - immediate surrender. At this point with both capital ships lost and one frigate partially sunk, the remaining two English ships broke off and ran for port.
It was a bloody battle, over quickly and containing several notable incidents. I declared it a Dutch victory. The Dutch lost one vessel sunk, two captured with damage to three more including the Vrede being partially de-masted however, their flagship was intact and two well armed ships remained operational. The English lost their two largest vessels one destroyed and the flagship captured. A frigate was destroyed and remained barely afloat whilst both HMS Unity and HMS Dartmouth were damaged to an extent.
The game took about 70 minutes to play. I am continuously fine tuning Neil Fox's excellent rules which were originally written for large multi player battles.
 |
| A moment from T3...The Fireship Rotterdam explodes! |
Getting more used to the rules, having added in some of my own detail and generally loving the game play, I decided it was time to get a bit more ambitious with the Dutch Wars naval action.
I now have enough ships painted and had so far resisted putting anything larger than a 3rd Rate on the table but that self-denying rule is now by the boards.
This battle was a surprise in that I thought it would last longer than the 15-18 turn games thus far played. Not a bit of it. It was done and dusted by the end of Turn 6. It was carnage from Turn 2 and the result was not as anticipated.
It is a pretty straightforward action set somewhere off the Suffolk coast. A raiding squadron of Dutch warships in search of prey is unfortunate enough to run into a powerful but numerically inferior group of ships of the English Red Squadron.
The objective is to vanquish the enemy! .
DUTCH Squadron
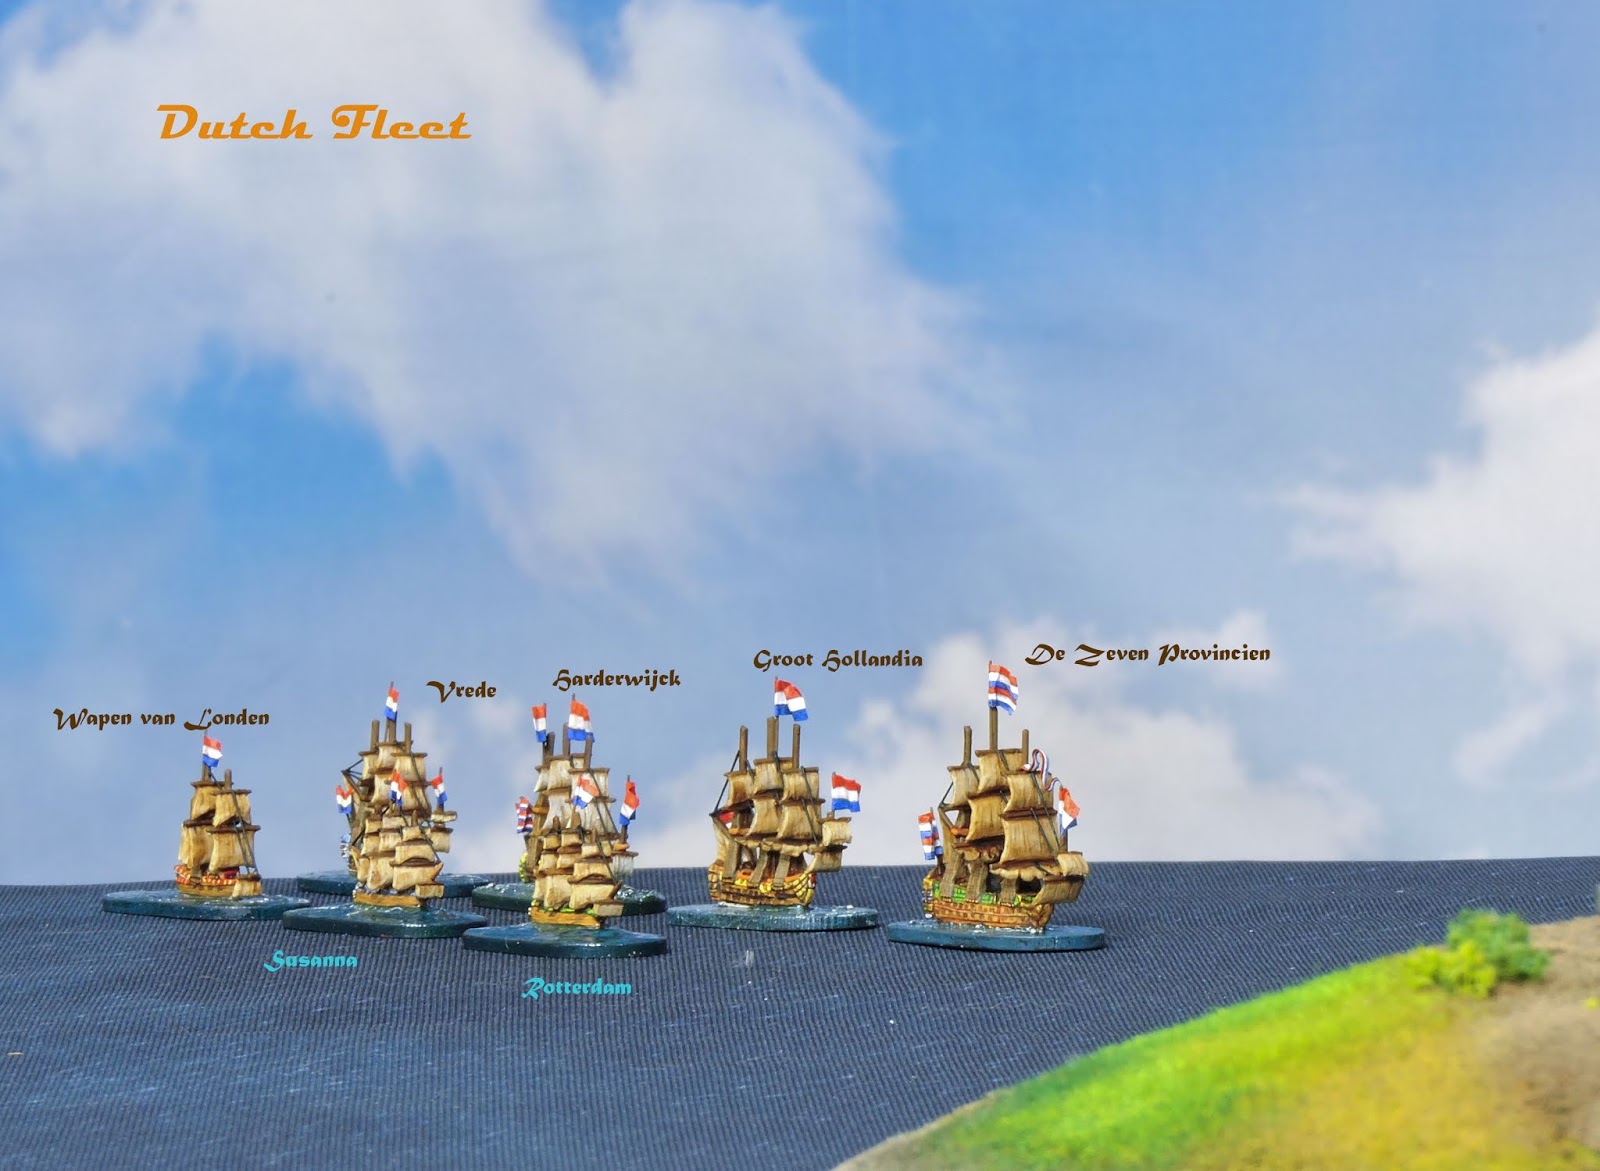 |
| The Dutch squadron approaches the English coast line. |
Battle Division
De Zeven Provincien - 2nd Rate, 84 guns, Veteran crew, Speed - Slow FLAGSHIP
Groot Hollandia - 3rd Rate, 64 guns, Veteran crew, Speed - Medium
Harderwijck - 4th Rate, 54 guns, Drilled crew, Speed - Medium
Vrede - 5th Rate, 46 guns, Drilled crew, Speed - Medium
Fireship Division
Rotterdam - Fireship, Drilled crew, Speed - Medium
Susanna - Fireship, Drilled crew, Speed - Medium
Wapen van Londen - Fireship, Drilled crew, Speed - Medium
ENGLISH Squadron

Battle Division
Prince - 1st Rate, 92 guns, Veteran crew, Speed - Slow
Royal Charles - 2nd Rate, 80 guns, Veteran crew, Speed - Slow FLAGSHIP
Unity - 4th Rate, 54 guns, Drilled crew, Speed - Medium
Independent commands
Dartmouth - 5th Rate, 40 guns, Drilled crew, Speed - Medium
Plymouth - 5th Rate, 40 guns, Drilled crew, Speed - Medium
 |
| T1 - Portsmouth has the sweetest shot to open the battle - raking the enemy flagship at effective range |
The English held the windward position but both commanders had equal ability meaning neither gained advantage for initiative. As it happened the English admiral won the initiative in four of the six turns including the first.
As the Dutch were sailing towards the coast from a north easterly direction they had to steer a course between two islands to gain the open coastal waters beyond. Both sides used strategic movement in T1 but the independent English 5th rates made great speed and so the remarkable battle fired up from the outset.
 |
| Portsmouth's extraordinary opening broadside smashes the steering gear of the enemy flagship leading the right column. |
HMS Portsmouth with the wind to her back sailed right across the channel and was able to rake the Dutch flagship with an astonishing first broadside. She scored six hits which caused a 'catastrophic damage' check on De Zeven Provincien. This resulted in the flagship's steering gear being shot and the rudder jammed dead ahead which meant for the entire battle her course was set!
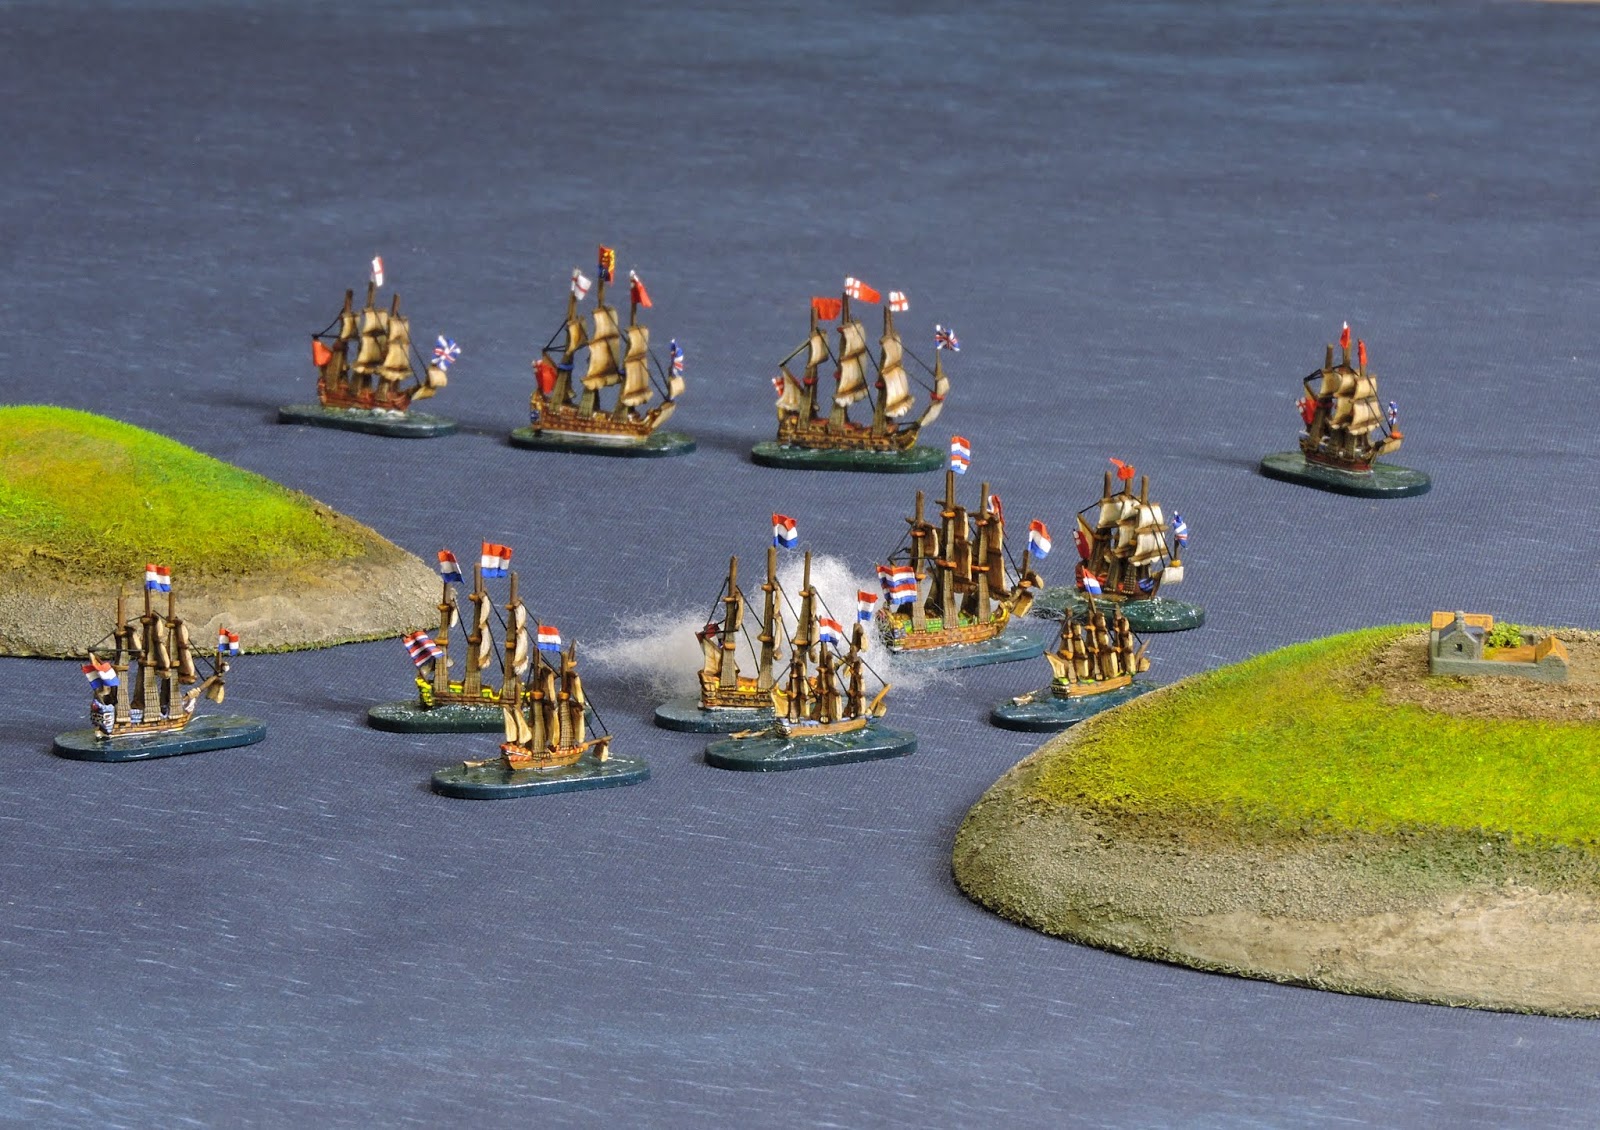 |
| T2 the two Dutch lines alter course to try and breakthrough to the open coastal waters |
The Dutch won the initiative on T2 and used it to throw their Battle Division forward. The flagship had no option but to steer dead ahead but the following ships turned to starboard to brings their guns to bear on the enemy. The Fireships also bore to starboard to squeeze through the channel into the open water whilst the English battle line turned to port veering away from the channel.
 |
| T2 as seen from the Suffolk coast. De Zeven Provincien bears down on HMS Portsmouth. |
With the English also winning the initiative on Turn 3 and many ships cramming around the tight channel three spectacular events occurred. HMS Dartmouth had raced to box in the line of fireships trying to sneak into the open water. She raked the lead vessel Rotterdam at close range causing at catastrophic damage check.
 |
| T3 The calamitous turn. DZP collides with Portsmouth and Rotterdam explodes! |
The highly combustible fireship exploded and vanished in a matter of seconds. Simultaneously, the formidable HMS Prince was subjected to heavy fire from three ships causing her magazine to explode and rendering her partially disabled. The unmanouvreable De Zeven Provincien had no option but to plough straight into HMS Portsmouth causing terrible damage, demoralizing her crew and killing her captain in the process.
 |
| T3 Thundering broadsides from Groot Hollandia and Harderwijck find Prince's magazine causing a huge fireball. |
Things were not going to plan for the Red Squadron but on T4 the initiative again went to the English who had to work hard to try and protect the damaged HMS Prince.
 |
| T4. Assailed on all sides and taking horrendous fire the massive HMS Prince strikes her colours. |
The Dutch Battle Division left the flagship to disentangle itself from the now sinking HMS Portsmouth and tried to cut the enemy line in front of HMS Royal Charles.The fireship Susanna attempted to attack the English flagship but was easily fought off. The English crew in turn grappled the smaller ship, boarded and captured her. Susanna had already been abandoned by her crew. Every Dutch ship passing the stricken HMS Prince shot into her forcing the giant to strike her colours having been reduced to a wreck.
 |
| T4 The gunnery exchange at its height. The large Prince is assailed from all sides and strikes. |
The Groot Hollandia came alongside HMS Royal Charles, both intending to board each other but the Dutch 3rd rate had the initiative and attacked the English flagship. In a fierce back and forth combat the English marines prevailed and the Groot Hollandia was taken and quickly cut adrift with a small prize crew aboard because De Zeven Provincien was looming through the smoke astern of the English ship and on course to smash into her on account of having no control of her steering.
 |
| T5 Seen from the North. The Suffolk coast is off to the right |
The Dutch at last grasped the initiative in T6. De Zeven Provinicen crunched into the stern of HMS Royal Charles further damaging both vessels. They grappled and the Dutch boarded the English ship capturing it in a lightning move which saw a dice differential of 7 points meaning - immediate surrender. At this point with both capital ships lost and one frigate partially sunk, the remaining two English ships broke off and ran for port.
 |
| T5. De Zeven Provincien comes up astern of the Royal Charles which has just captured Groot Hollandia |
It was a bloody battle, over quickly and containing several notable incidents. I declared it a Dutch victory. The Dutch lost one vessel sunk, two captured with damage to three more including the Vrede being partially de-masted however, their flagship was intact and two well armed ships remained operational. The English lost their two largest vessels one destroyed and the flagship captured. A frigate was destroyed and remained barely afloat whilst both HMS Unity and HMS Dartmouth were damaged to an extent.
 |
| The end of the battle. A Dutch victory. The only vessel missing is the drifting partially sunk Portsmouth off to the right. |
The game took about 70 minutes to play. I am continuously fine tuning Neil Fox's excellent rules which were originally written for large multi player battles.